Marshmallow Birds Nests, and Other Cute Things

 tend to have an issue with food that values being cute over being delicious. It’s just not my cup of tea. It’s not that I have a problem with food that looks sweet, but like cake pops, or cakes covered in fondant, I just don’t totally get it.

And yet… Easter. It just wants you to make overly cute things. And it wants you to give those overly cute things to the insane cuteness that is your niece and nephew.

Friends, I am obsessed with my niece and nephew. They are the kids I want one day, they are the kids you dream your boyfriends sister will have, and they are the kids you dream of babysitting. They are that cute, that well behaved, and that affectionate.

And so my thoughts on overly cute foods has been over ridden, by my love of overly cute kids.

I’m sorry.

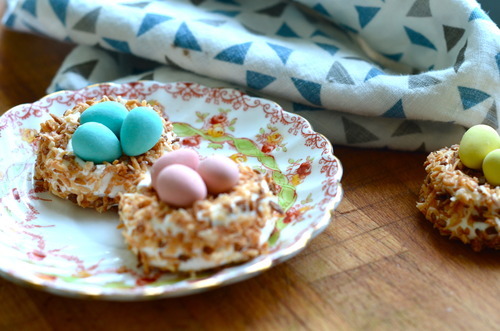
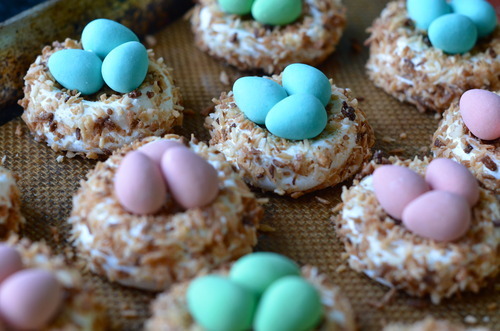
Except I’m not really, because these are also super tasty. They are basically just toasted coconut marshmallows (delicious) with Cadbury Mini Eggs on top, and I’m not going to pretend that I’m above a Cadbury Mini Egg at Easter time. I’m totally not above it.

*PS don’t forget to enter the giveaway from earlier in the week! The winner will be decided on Wednesday!

3 pkgs Unflavoured Gelatin

1 1/2 cups Sugar

1 cup Corn Syrup, Brown Rice Syrup or Cane Syrup

1 tbsp Vanilla Extract

1 tsp Coconut Extract

2 cups Shredded Coconut, toasted*

2 tbsp Icing Sugar

3-6 drops Lemon Juice,

Cadbury Mini Eggs

*Toast the coconut by putting it on a tray in a thin layer in an oven preheated to 325F.

When it get’s nice and brown you’re in business.

Line two baking sheets with a silpat or parchment paper. Spray them with cooking spray or put a bit of a neutral oil, like canola, on a cloth and wipe it on the parchment/silpat. Marshmallows can be very sticky.

In the bowl of an electric mixer fitted with the whisk attachment, stir the gelatin with 1/2 cup of cold water. Let sit.

Meanwhile in a medium pot mic together the sugar and syrup with 1 cup of cold water. Put the lid on and over medium heat bring to a boil, stirring occasionally to make sure all the sugar has dissolved.

Once the sugar is completely dissolved take the pot lid off and turn the heat to high. Put in your candy thermometer and cook until the syrup comes to 240F

Pour the syrup into the mixing bowl and quickly turn the mixer on to medium, and then once it starts to thicken, to high.

Keep it on, after about 10 minutes your mixture will be thick and white, and starting to pull away from the edges as it turns.

It will thicken quickly so this part has got to be quick!

In a piping bag fitted with a medium plain piping tip, pipe the nest. Pipe a small circle and then go around the edges to create the sides. They will slump down a bit as they cool.

Allow to cool and harden for at least 6 hours, or overnight.

Put the toasted coconut into a bowl and put your marshmallows in, one at a time. Depending on how long you let them dry you may need to press the coconut in to make them stick. That’s okay.

Now mix together the icing sugar and lemon juice.

Dip one side of each egg into the frosting and use it as glue to stick the eggs into the nests.

AND now give them to cute small children and be merry.  

Spring Coloured Meringues

image

When I first moved into this little apartment it was all sorts of crazy colours, there was purple, and lots of yellow and the living room was a bright Tiffany’s blue. And I hated all of them, I painted it all white, but the blue. For some reason I just needed the blue. After living here for 5 years, I think I’ve finally figured it out- it reminds me of the sky that we only get a couple months here.

See, Vancouver does this thing, this dreadful thing where it rains all the bloody time. It starts in late September, early October if we’re lucky and it keeps raining until May, or June, or sometimes, even July. I’m not joking, we sometimes only get 3 months of sunshine. Last year was one of those years, and maybe that’s why I feel like I’m struggling so much with it right now.

My saving grace in all this rain is the flower shop I live on top of. It regularly wins best florist in the city and with good reason, it has the most gorgeous blooms in every imaginable colour, all the time. And even when everything is grey and gloomy and damp when I walk out my door I see heaps and heap of fresh flowers. They even take the old roses and sprinkle their petals half way down the block, to bring a bit of colour even further. They really are the best.

So lately I’ve become obsessed with their colours, the soft peachy ranoculous, the bright red of the tulips, and these soft yellow roses, oh those roses. They give me hope that it is sunny somewhere in the world. And so I made these meringues to bring some more of that colour in, because in this dreary grey city, sometimes you just need colour.

Spring Coloured Meringues

6 Egg Whites

1/4 tsp Salt

2/3 cup Sugar

1 cup Icing Sugar

1 Vanilla Bean, OR 1 tsp Vanilla Extract

Food colouring

Preheat your oven to 200F

In the bowl of a standing mixer fitted with the whisk attachment, whisk the egg whites and the salt until they hold soft peaks. 

Tablespoon by tablespoon add in the granulated sugar, letting the sugar you added before be mixed in completely before adding in the next. 

Now let it keep running until it holds very stiff peaks, if you’re unsure just keep it on for another 20 seconds or so. It’s very important that it is very stiff. 

Add in your vanilla bean or extract. 

Now dump in all the icing sugar and mix that in- bring the speed down to low so the sugar doesn’t fly everywhere. 

Divide the meringue into as many bowls as you want colours- I did 4. 

Add the colouring and mix until they are all combined, or not and let it be swirly- it’s up to you!

You can use any piping tip you want to here, star tips are popular, so are just a plain circle. It’s up to you!

Now just pipe them onto trays lined with parchment or a silpat (don’t grease the trays though!! Your meringues will ruin if you do!) and bake for about an hour and a half until they are completely dried out. Check them every 25 minutes or so to make sure they aren’t getting any colour. If they are browning turn down the heat and rotate the trays. 

Allow to cool completely then eat, decorate, or put in baggies for gifts- these will store for up to a month in an airtight container.