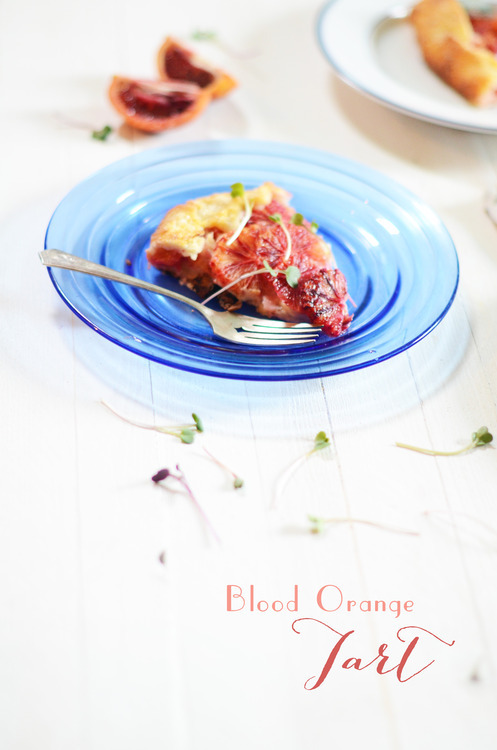
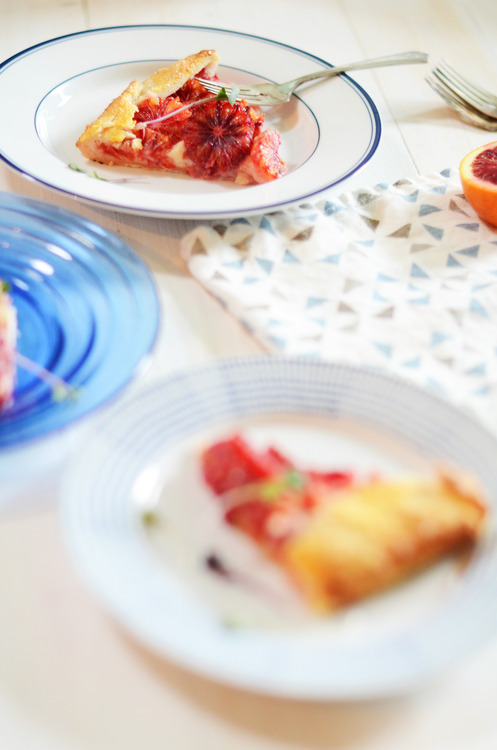
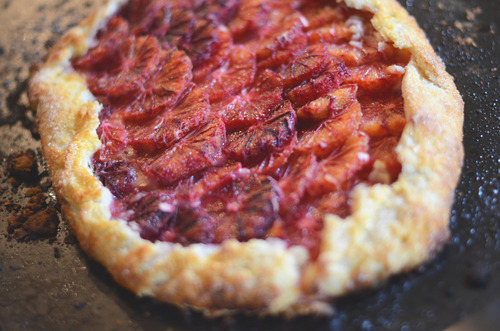
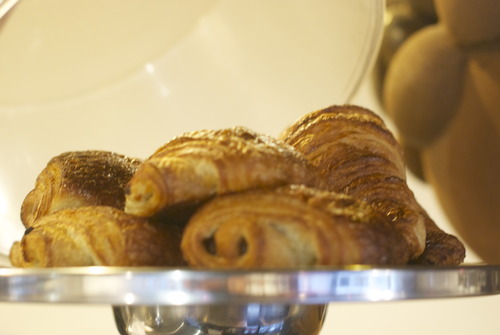
Blood Orange Tart!

image

You know when you see foods that’s too pretty. Like it can’t possible taste good?

I kept seeing pictures of blood orange tarts, and thinking “oh my gosh they are so beautiful, but I bet they aren’t super delicious”. I’m rarely a big fan of cooked oranges. I felt like baking them, even in a buttery crust, might not be the best idea. I mean, blood oranges are perfect as is, why do anything to them?

Well, I’m here to tell you that you should.

You should make a pastry cream, you should make some super flakey dough, and you should layer a whole bunch of blood oranges on top.

image

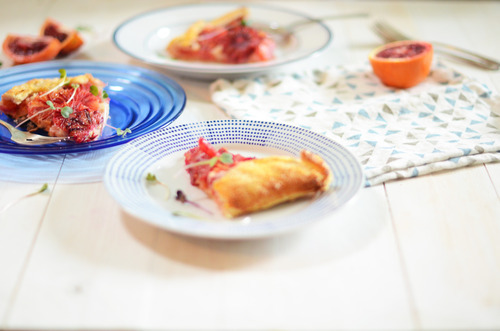
Because suddenly the butter and vanilla bring something extraordinary to the blood oranges, and the oranges themselves stay almost exactly the same. They are still juicy, and bright and crisp, they just happen to have married themselves with some sweeter things.

It’s a simple tart, but one that’s rather showy, and one that perfectly uses up the remarkable produce available right now.

 image

Blood Orange Tart

For Flakey Pastry

1 cup Butter, cut into small cubes

2 cups AP Flour

1 tsp Salt

Cold Water

For Pastry Cream

1 cup Milk

½ Vanilla Bean, or 1 tbsp Vanilla Extract

2 tbsp Cornstarch or AP Flour

¼ cup Brown Sugar

1 Egg

8 Blood Oranges

1 Egg Yolk

1 tbsp Milk

¼ cup Coarse Sugar

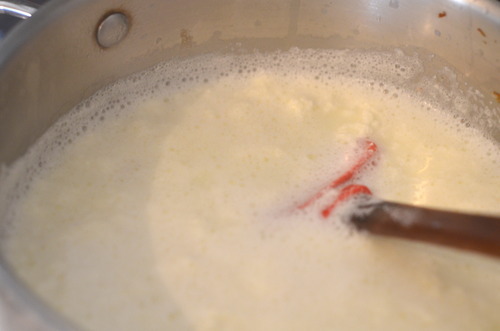
Bring the milk and vanilla bean up to a simmer in a small pot.

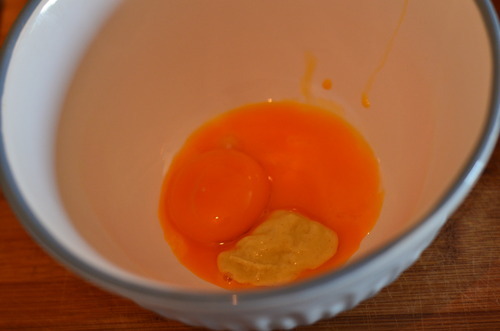
Meanwhile mix together the sugar and egg in a medium sized bowl. Add in the cornstarch or flour, depending on what you use.

Slowly add in the hot milk, whisking the whole time.  Pour the mixture back into the pot, and turn the heat down to low.

Stir constantly until the mixture thickens consistently.

Immediately strain into a bowl, cover with plastic wrap and chill.

Cut Oranges:

Cut the tops and bottoms off the oranges. Cut the skins off too, leaving no white pith.

Cut the oranges widthwise, into rounds.

Make dough:

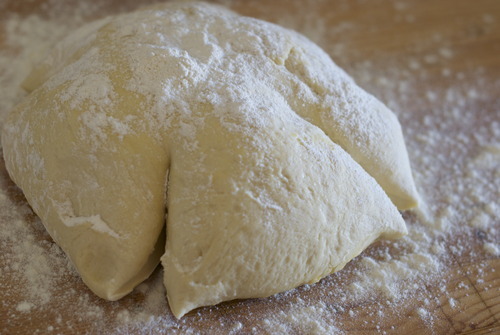
On a large clean surface mix together the butter, flour and salt.

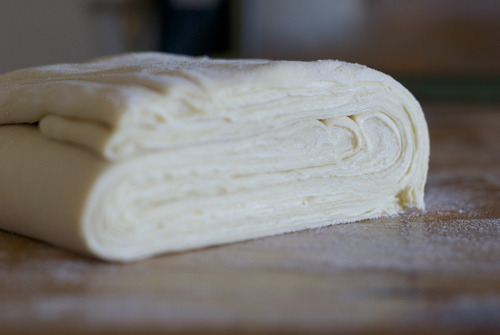
With a rolling pin roll the butter into the flour, scraping the strips of butter off the rolling pin, and the counter. Keep rolling and scraping until all of the butter is stretchd into long thin strips.

Tablespoon by tablespoon add in the cold water, with the help of a pastry scraper gently mix the flour and butter with the water. You want to keep the butter in strips as much as possible.

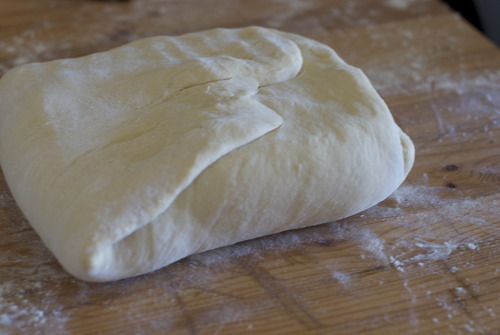
Once the dough has begun to come together flatten it with your palms, and fold the dough in half. Do this again and again until the dough has lots of layers, but before the dough begins to get tough. It’s best to stay on the side of too soft, and only fold the dough a could times.

Line a baking tray with parchment paper.

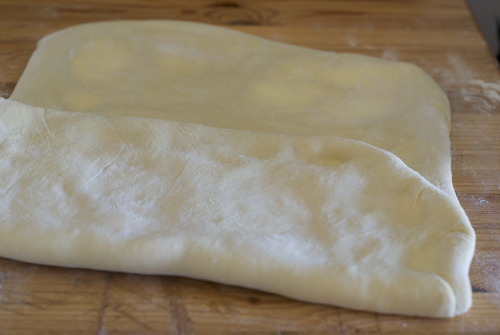
Roll the dough into a large rectangle and fold it gently into quarters. Lift the rectangle and place it onto the lined tray.

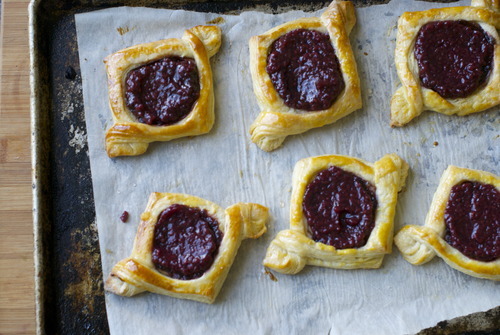
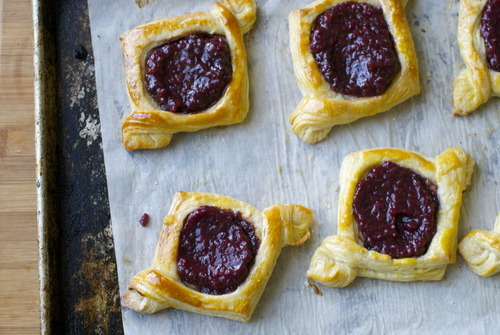
Scrape out the pastry cream into the middle of the dough. Spread it out, and cover the whole thing except for an inch and half border around the edges.

Layer the slices of oranges on top.

Fold the edges of pastry up around  the fruit, pleating as necessary.

Put the tray in your freezer for at least 25 minutes.

Preheat the oven to 375 degrees.

Take the tart out of the freezer.

Mix together the yolk and milk in a small bowl.

Brush the edges of the pastry with egg wash and sprinkle liberally with the sugar, both on the fruit and on the edges.

Bake for 35-45 minutes, until the pastry is nicely browned.

Let the tart cool for at least 30 minutes before cutting and eating!

image

Red Wine Salt

You know that moment the morning after a couple too many drinks when you first wake up, and realize that you forgot to put the cork in the bottle of red, that you opened much too late and drank only half a glass out of?

And it’s sort of heart breaking that that lovely bottle that so many grapes died for is now just going to be thrown down the drain?

And you think, well, maybe I opened it late enough and you put the cork back in it and hope for the best, but by the time you open it up the next day (lord knows you’re not trying anything boozy that night) it’s absolutely tragically off.

I can’t be the only one who does that right?

So recently a friend of mine suggested red wine salt as a solution, and my brain nearly exploded.

There is a use for corked and terrible left over wine?

How am I only just figuring this out?

It’s a day full of questions.

Here’s what you need to know.

You take that wine, you reduce it down like crazy, and when it’s a thick syrup you stir in a whole bunch of coarse salt, and then you spread it on a tray and let it sit out overnight.

And the next day, unlike the last when you woke up knowing that you’d ruined a bottle of wine, you wake up to something wonderful. Something that will instead add a bit of depth to your steak dishes, and gussy up a piece of duck, and look tres chic on your dinner table when you’re entertaining.  Or bottle it up and give it as a hostess gift!

Just don’t tell them that really, it’s just the cheapest salt around with an old bottle of wine.

Red Wine Salt

1 bottle of Red Wine (give or take a glass)

2+ cups of Rock Salt

In a medium pot over medium heat reduce wine until it becomes a thick syrup. This will take about 30 minutes.

For every tablespoon of liquid that you have add in 1 ½ cups of salt

Mix together well and spread on a baking sheet lined with parchment paper.

Allow to sit out overnight, or until very dry.

Bottle up and give as gifts, or save for you

Stocking Stuffer Sundays- Calvados Caramels

Last Christmas was awful. Beyond that actually, last December was awful. It was single handedly the most stressful month of my working life, I learnt the important lesson of saying no, I can’t do that, albeit too late. And poor Jordan had major hip and knee surgery and couldn’t do much of anything without a lot of assistance. Which is why this year I decided we needed to truly get into the Christmas season and do everything we could do make up for last year.

This means dinner parties with friends, decorating our apartment even though we’ll be out of town for the actual day, and trying to just do little festive things for each other to get us in the spirit.

And then today it snowed! It never snows in Vancouver! I am so excited. It’s a little ridiculous.

Also ridiculous are these calvados caramels. It’s like eating a candy apple, only much richer and unctuous. Little bags of these will be going in everyone’s stocking this year, and while you might be intimidated by any recipe that needs a candy thermometer, I promise these are actually very easy to make. 

Calvados Caramels

3 ½ c Sugar

1/3 cup Corn Syrup

¼ cup Water

200mL Heavy Cream

100mL Apple Cider

100mL Calvados

3 ¼ c Butter, cut into pieces

1 tbsp Salt

Line a baking sheet with parchment, and lightly grease. Put aside.

In a large heavy bottomed pot stir together the sugar, corn syrup and water.

Put a lid on it and bring it to a simmer over medium heat.

Allow all the sugar to dissolve with the lid still on- this helps keep sugar from crystallizing on the edges.

Remove the lid when it’s all dissolved and, without stirring, allow the sugar to caramelize.

When it is a nice auburn colour add in the cream. It will spit and boil like crazy- it’s okay, just be careful!

Add in the apple cider and 50 mL of the calvados. Stir in the butter, piece by piece, with a whisk. DO not stop whisking, this will make sure it’s totally emulsified.

Put in your candy therometer and, while stirring constantly bring the caramel sauce up to 254F

Stir in the remaining calvados (again it will bubble and hiss, again be careful!)

Pour into prepared pan.

Allow to sit for at least 4 hours before cutting and rolling. 

Orecchiette with Yoghurt, Spinach, Hazelnuts and Feta

Sometimes I just get stuck on a recipe. I’ll see it in a book and think, that’s weird/different/crazy/maybe delicious but I’m not sure yet, and I won’t make it for fear that what ever is weird/different/crazy/or maybe delicious will actually be awful and I’ll have wasted time and money on something I’m going to end up pushing to the back of my fridge so I can’t pretend I forgot about it until it’s too old and I have to throw it out.

I do this a fair bit. Because usually when I think something is weird and might not turn out, it doesn’t. And there are few things more frustrating than making something you think might not work, and then having it not work for just the reason you thought before you started. I’m learning to trust my gut on this.

The exception to this rule is Ottolenghi. Because he puts some things together and I think “I’m not sure about this” and then it’s always amazing.

And so with this proven track record of exceeding my expectations, I made pasta with a yoghurt based sauce.

I have been staring at this recipe since I bought the Jerusalem cookbook over a year ago.  My love affar with yoghurt is logn and well documented, but on pasta? I’m a little bit Italian and that seems pretty sacreligious to me.

Guys. I should not use my head, and instead to use Ottolenghis. I shouldn’t pretend I know better.

I don’t.

This pasta is wonderful. It’s light and creamy and tangy- the way you would expect from the yoghurt, but it’s also crunchy from the nuts, and super salty in certain bites from the feta.

I had to make a few changes to the recipe- I switched the pine nuts from the original to hazelnuts, because I had them kicking around, and inexplicably my local shop was out of frozen peas (seriously, who runs out of frozen peas?) so I used spinach instead.

The result was a pasta that was totally unexpected, and one that you should probably make right away. Seriously. Do it now.


Orrecciette with Yoghurt, Spinach and Hazelnuts

1lb Orecciette

2 cups Greek Yoghurt

4 cups Baby Spinach

¼ cup Basil, roughly torn

½ cup Toasted Hazelnuts, coarsely chopped

½ cup Feta, crumbled

2 tbsp Olive Oil

Salt and Pepper

Bring a very large pot of water to a boil. Salt generously.

Cook pasta to directions on box.

Meanwhile, in a food processor pulse the yoghurt with 2 cups of spinach, the olive oil and some salt.  Mix until smooth.

Pasta is cooked, strain. Immediately mix together with the yoghurt mixture, and then toss in the basil, hazelnuts and feta.

Eat immediately. 

Stocking Stuffer Sundays- Homemade Irish Cream with FREE downloadable labels

image

Oh I’m so excited for Stocking Stuffer Sundays! They were easily one of my favourite series I’ve ever done on the blog and, perhaps because I am such a huge lover of all things Christmas, I’m so jazzed to be starting it up again!

Just like last year every Sunday I’ll post a fun edible gift that you can make and give. And just like last year there will be a cute fun free downloadable gift tag option! Only this year, with my mad new photoshop skills that I learnt at Blogshop a couple weeks back, I was able to design the tags myself.

On a side not, how fun is photoshop? I was so intimidated for so long, but no longer!

So without further ado here is one of the easiest recipes you’ll ever find on this site- Irish Cream. Sometimes known as Bailey’s, it literally takes 5 minutes to make, but instead of being full os preservatives this stuff is just cream, condensed milk, whiskey, vanilla and coffee.

But I hope you look at this as a jumping point- add in more coffee if you want a darker flavour, stir in some melted chocolate, or caramel for a more dessert flavour. Basically, mix it up as you like, this is just the beginning!

image

Click here to get the FREE downloadable labels!

image 

Irish Cream

1 cup Cream

1 cup Whiskey

1 can Sweetened Condensed Cream

1 tbsp Vanilla Extract

1 oz. Very strong coffee, or a shot of espresso

pinch of salt

Mix all your ingredients into a blender and mix for 30 seconds. Don’t over mix of it 

image

Sunday Sides- Roasted Squash with Yoghurt Cilantro Sauce and Pomegranate Molasses

image

Hi All, 

I’m just letting you know that for the next couple months I’m going to be changing up my Sunday Salad column to a Sunday Sides column. This is to prep for American Thanksgiving (Sorry Canada) and for Christmas. It will be full of veggie side dishes (and sometimes mains) that will hopefully inspire your holiday tables. I’m also doing it because this time of year begs for hot dishes, and as much as I love salads, and I do, I am craving things warm and cozy. And now to begin!

As sad as I am to see the summer go, and I am, there is something comforting about the fall. The cozy sweaters, the thick socks, the covering up your bad hair day with a cozy hat. I have been doing a lot of this lately, largely in my apartment. Why are you wearing so many layers in your apartment you ask? Because, my apartment is heated through radiators, and my landlord, who is essentially a slumlord, turns off our heating at night. Yes, that is correct. He doesn’t turn down the heat at night (from the very low temperature he keeps it at during the day), he turns it off.  Let it be clear that it’s not like I have thick windows to keep out the draft (they are in fact so thin they rattle aggressively when someone playing music with a loud bass drives by) or I have heated flooring or anything like that. 

Friends, it is a high of 3 degrees celsius today (that’s 37 to you crazy non metric people). It is bloody cold. So cold in fact that I started keeping my oven on with the door open during the day to heat my apartment. 

The things we do for cheap rent. 

So, now that the oven is on 8 hours a day I’ve been roasting everything in sight so I don’t feel so wasteful of energy. Chickens, squash, carrots, apples. Nothing is off limit, as long as I can open the door every half hour or so to keep the temperature of my apartment up. No soufflés here, just straight up roasting. 

One of the things I roasted were these lovely acorn squash. And after they were roasted I spooned on some cilantro yoghurt sauce, and then I drizzled them with some pomegranate molasses.  And they were crazy delicious. I recommend you do the same, weather or not you are heating your living room with your oven 

image

Yoghurt Cilantro Sauce

1 cup Greek Yoghurt

1 bunch Cilantro

1tsp Cumin Seeds, ground

1tsp Coriander Seed, ground

2 tbsp Lemon

2 tbsp Olive Oil

Salt and Pepper

2 Acorn Squash

1/4 cup Pomegranate Molasses*

Salt, Pepper, Olive Oil

Preheat your oven to 400F

Line 2 baking sheets with parchment paper.

Peel your acorn squash. It’s a bit tricky to get into the grooves but try to be meticulous. 

Cut them in half and scoop out the seeds. Reserve the seeds!

Slice the squash into pretty U shaped pieces

Toss them with some salt, pepper, and olive oil and and put them on one of your prepared baking trays.  Roast unit they are cooked through, roughly 45 minutes. 

Meanwhile, put the seeds in a colander and wash to remove the bits of squash flesh. 

Toss them in more salt, pepper and olive oil and put them on the remaining prepared sheet tray. 

Bake until they are crispy- about 15-20 minutes. Open the open half way through cooking and stir. 

Meanwhile make your dressing:

Combine all ingredients except the lemon juice in a food processor and pulse until combined. Add the juice to taste, so that it is zippy but not too sour. If you don’t have a food processor just finely chop the cilantro up and mix it all in a bowl. It will still be delicious. 

When the squash is finished roasting place it in a pretty pattern on your serving dish. Drizzle the pomegranate molasses on top, and dollop the cilantro dressing around. Sprinkle the squash seeds on top!

image

Tuesday Tutorial- Homemade Ricotta Cheese

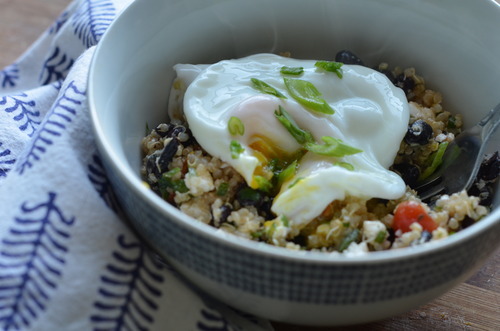
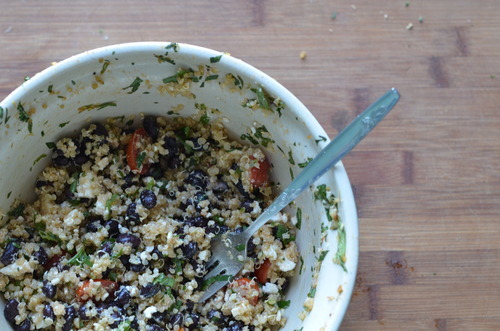
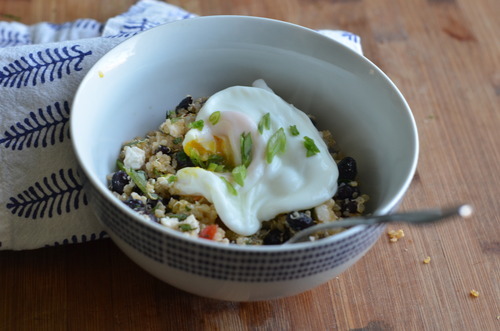
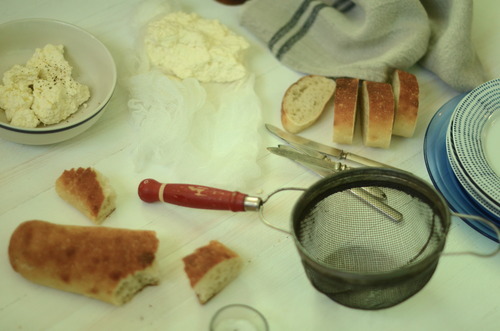
,I live in a very Italian neighbourhood, and my local market makes the most outrageously good ricotta cheese. The thickest, creamiest, most glorious ricotta I’ve ever had. It’s so good.

It’s also $12.00 for 500mL. The deliciously is directly linked to the price tag.

I have made a lot of ricottas in my life. Sometimes for restaurants, sometimes for home, and it’s always good. It is. But it’s never as good as the kind I can buy at the market. So I gave up for a while, I didn’t want to go through the trouble. I forked over the cash when I had a craving.

The trouble, is that to fully appreciate ricotta you have to eat it at room temperature, or slightly warmer. When it has just been made, slathered on good bread, and dipped in olive oil and sprinkled generously with maldon salt- it is the best and simplest snack ever. Put a salad beside it and you’ve got a downright brilliant lunch.

So I started experimenting with recipes, trying to make one as good as the Italian brand down the street, but that I could make at home and then eat while warm. Ricotta isn’t hard to make, you just bring some milk to a boil, add in some lemon, stir it until it occurs, and strain it. It’s a funny thing really, because traditionally ricotta is made by reboiling the whey of other cheeses, the whey of course being nearly completely fat free (the word ricotta literally means twice cooked), but ricotta is ever so much more delicious when you add in fat.

A lot of recipes call for 1 litre of milk and one cup of cream, but I add just a half cup more cream, and it makes a world of difference. Such a difference in fact, that I prefer it to the store bought kind down the street that costs twice as much. Small miracles my friends, small miracles.

Ricotta Cheese

1 litre Whole Milk (or homogenized)

1 1/2 cups Whipping Cream

Juice of 1 Lemon

1 1/2 tsp Salt

Line a large sieve with cheesecloth

Bring the milk and cream to a roaring boil.

Add in the lemon juice and stir, still over the heat, until thick curds have formed.

Pour the liquid into the prepared sieve, put the sieve over a bowl and allow to cool at room temperature for about an hour. You can make it a bit thicker by letting it sit longer if you’d like.

Remove the cheese from the cloth, and serve immediately, or store in an airtight container in the fridge for up to a week.  

Tuesday Tutorial- Homemade Mayo!

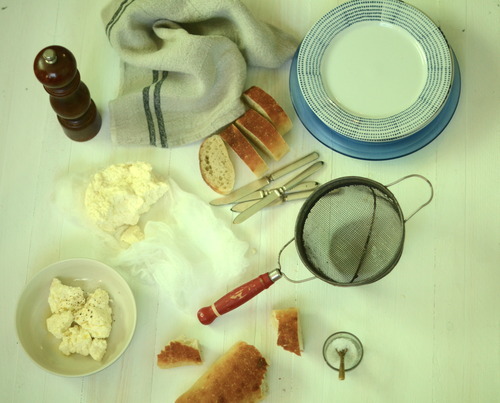
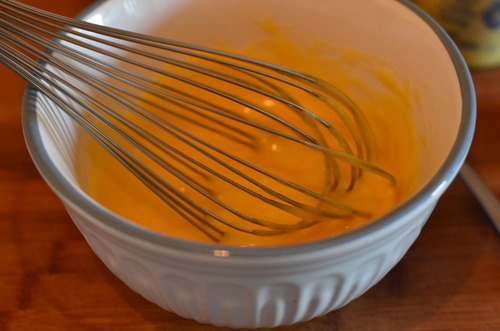
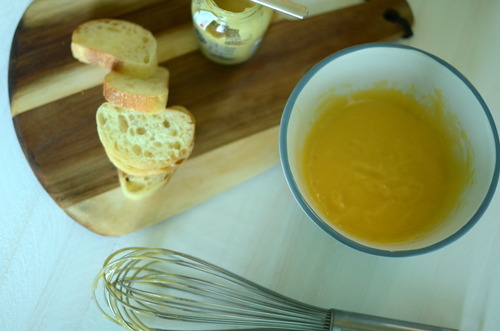
The very first thing I learnt at the very first restaurant I ever worked at, was how to make mayo. Specifically this herb laden, lemon spiked, garlicky mayo that we served with the frites. The sous chef at the time swears to this day that when he tried mine, and I had made it taste just like he showed me, he decided to take a chance on me and mentor me.

So when I say my life was changed by mayo, I am not even kidding a little bit.

Career altering mayo. Fact.

I still make mayo pretty regularly- the idea of keeping egg yolks and oil at room temperature for months at time creeps me out, so I try to do it myself as much as possible. It takes only minutes, is preservative free, and tastes just a world better than the jarred variety.

And once it’s made the fun comes in. Adding roasted garlic? Squeezing in some more lemon? Flecking in some parsley and thyme? Maybe mixing in chipotle spice, or smoked paprika, or Old Bay seasoning.The options are limitless, and nearly all of them are delicious.

Homemade Mayo

1 Egg Yolk

1 tbsp Dijon Mustard

2 tbsp Lemon Juice

1/2 tsp Salt

1 cup Vegetable Oil

Mix together the yolk, dijon, salt, and lemon juice.

Very slowly drip in the oil and whisk vigorously.  

When it starts to get very shiny, add in a few drops of the lemon juice. 

Repeat this- adding oil, and then lemon juice, until all the oil is mixed in. 

Taste it and check for seasoning. I like mine pretty lemony but you can play around with it and add less if you’d like. 

And you’re done! Easy isn’t it?

Poached Eggs Toast with Roasted Asparagus and Herbed Ricotta

Unless you’re a cook, I’m not sure if you will appreciate what I’m about to tell you. I’m not sure if you’ll understand that gravity of my next statement, unless you have spend countless years working every evening and weekend of my entire adult life, but I, Claire Lassam, don’t work on weekends any more.

To non cooks let me tell you this- for the first time in our 6 year relationship, my boyfriend and I have the same days off.

It is amazing.

I am not exaggerating when I tell you it’s a small miracle.

I am so very very happy about it.

Jordan on the other hand, is working all the blooming time these days, and about once a week he’s taking the ferry over to Victoria. So I thought I should meet him on the island and we should escape for a couple days. Actually I’m thinking we should do this all the time.

Oh man I love Vancouver Island. I really really really do.

The people are so nice, the weather is so much better, the scenery is totally comparable to where I currently live.

I just love it.

While we were away I made this little breakfast. Nothing fussy- just some toast and asparagus and ricotta with an egg on top, but it’s rich and comforting and so simple to make. And it was just about the perfect thing to eat while sipping hot tea, reading a book, and just generally being very calm, very relaxed, and very happy.

Poached Eggs with Roasted Asaparagus, Ricotta, and Sourdough Toast

4 Eggs

4 pieces Sourdough Bread

1 cup Ricotta

zest of 1 Lemon

2 tbsp Parsley, chopped finely

1 bunch Asparagus

Olive Oil

Salt and Pepper

Preheat oven to 400F

Break the bottoms of the asparagus- don’t cut them, they will break where the woody part ends.

On a lined baking tray spread out the asparagus, and mix with a good glug of olive oil, some and pepper.

Bake for about 15 minutes, or until the tips are crispy, but they aren’t soggy.

Bring a large pot of water to a boil.

Meanwhile mix the ricotta with the zest, parsley, salt and pepper.

Poach the eggs- break them into the large pot of water and turn the water down to a low boil. Cook for about 3 minutes for soft poached eggs.

Toast the bread.

Spread the ricotta mixture on the toast, put a handful of asparagus on top of that, and top each piece with an egg.

Sprinkle some more salt on top and enjoy!

Sunday Salads- Pea and Fava Bean Salad with Fresh Mint and Coriander

Today is a day for peas and fava beans. It is a day for bike rides, walks on the Seawall, and beers on patios. It is a day to celebrate, because it is 25 degrees out, there isn’t a cloud in the sky, and this must be the nicest Spring I remember since I moved to Vancouver over 6 years ago.

So today is a day for peas and fava beans.

Normally I just cook them in a bit of butter and call it a day, but today I felt like I had to do something a little more special. So I tossed in some mint, coriander seeds, garlic, and lemon zest and served it cold.

This is such a simple salad, and it completely relies on using really good quality ingredients- the freshest favas and peas you can find. I would love to say I picked them from my garden this morning, but sadly nothing lasts in this little apartment besides succulents, but I am spoiled rotten with my local market.

Fava Bean and Pea Salad with Fresh Mint and Coriander

1 1/2 cups English Peas, shelled

1 1/2 cups Fava Beans, shelled *

1 tsp Whole Coriander Seeds, gently crushed with the side of the knife.

1 Lemon, juiced and zested

1/4 cup Fresh Mint Leaves

1 clove Garlic, thinly sliced

2 tbsp Olive Oil

Salt and Pepper

Bring a medium sized pot of water to a boil. Put in a good pinch of salt.

Fill a medium sized bowl 3/4 full with ivery cold water.

Blanch the fava beans in the boiling water for about 2 minutes. Scoop them out with a slotted spoon and immediately put them in the water. Stir them around for a couple minutes.

Remove the favas from the ice water and remove the hulls- pinch off the white outer layer from the beans and discard it.

Blanch the peas in the exact same way- 2 minutes in teh boiling water and then straight into the water.

In a small frying pan warm the olive oil over medium heat.

Put in the garlic and stir until it is aromatic. Toss in the coriander and cook for another 30 seconds, being sure not to let the garlic burn.

Pour over the favas and peas.

Mix in the zest, half the lemon juice and the salt and pepper.

Taste it and check the seasoning, adding more lemon juice and salt as needed,

Tear the mint apart and toss it in as well!

Cinco De Mayo Dessert! No Churn Dolce de Leche Ice Cream with Coconut Ganache

Dolce de leche has got to be one of the greatest things of all time. It’s a very simple idea- take sweetened condensed milk and caramelize it- whoever thought of it was a very, very clever person.

BUT whoever realized that instead of painstakingly stirring a pot of sweetened milk without burning it, you could just put a whole can in a pot of boiling water and leave it for 3 hours, and when you return the insides will have turned from white to auburn, and the taste will have changed from sweet milk to the richest caramel you could ever hope to know? Well that person was straight up genius.

Periodically, if I know I’m going to be home for 3 hours, and I’m feeling uncharacteristically organized, I pull out a big pot and make some dolce. It’s the sort of thing that makes everything feel a touch nicer- basic chocolate cookies? Sandwich some dolce in the middle. An end of the evening coffee? Stir in a spoonful of the good stuff. A bowl of vanilla ice cream? Drizzle some of this on top for a totally decadent dessert.

Or better yet- put it in your ice cream.

The blogosphere has been going crazy for a couple months now with this revelation that you can make fabulous ice cream without an ice cream churner- all you do is whip up some cream and condensed milk and throw the whole thing in the freezer. But, if you happen to have some dolce kicking around in your cupboard, you might as well use that instead.

This is truly one of the simplest things I think I’ve ever made. And the texture of this ice cream is unreal. Unreal.

Most ice creams that don’t use a machine tend to get icy quickly, to get so hard it’s difficult to scoop them, and to lack that smoothness of really good ice cream.

I’m not even kidding you- this has the texture of soft serve. A week later, it still had the texture of soft serve. It is soo smooth.

The only possible thing that might make this better, is if you made a ganache with coconut milk and poured that, while it was still warm, over top of your ice cream. It is the perfect way to celebrate Cinco de Mayo, and also most nights of the week.

So here is how you make this, and you should probably make this right away.

Dolce de Leche No Churn Ice Cream with Coconut Milk Ganache

Makes about 1.5 liters

Ice Cream

1 175mL can Dolce de Leche*

600mL Heavy Cream

1 tbsp Vanilla Extract

Ganache

1 cup Coconut Milk

1 cup Dark Chocolate

Coconut shavings for garnish

*To make dolce de leche take the whole can, unopened, and put it in a pot of water with at least 1 inch of water above it. Bring it to a boil. Boil it for 3 hours topping up the water periodically- if the water gets too low the pressure in the can can change, and apparently it can explode, so be mindful. After 3 hours take it out and let it cool completely before opening.

In the bowl of standing mixer fitted with a whisk attachment whip the dolce de leche, heavy cream, and vanilla until it is very thick- about 10 minutes.

Put into an air tight container and freeze for at least 4 hours, or preferably overnight.

Put the chocolate into a medium sized bowl.

In a saucepan bring the coconut milk up to a boil.

Pour over the chocolate, let it sit for 30 seconds and then whisk until it is smooth.

Scoop your ice cream, pour your ganache, and eat to your hearts content!

Sunday Salads-Quinoa Salad with Tomatoes, Black Beans and Feta, with a Lime Cilantro Vinaigrette

The internet has a funny way of throwing things at you. You know, you see something once and think “hmm, that doesn’t look bad” and then you see it another 40 times and at that point you just have to make it because you’ve seen it so many times and you need to get up on the trend? Even if at this point it’s far from trendy?

Well, the quinoa burrito bowl has been doing the rounds on social media lately. First I saw it on tastespotting, and then I noticed it on twitter, and by the 54th time I saw it on Pinterest I had to make it. It’s a simple thing really, quinoa, refried beans, salsa, and a little cheese on top. It took less than half an hour to make and was a very tasty simple dinner, except that Jordan all but refused to eat it.

See, Jordan likes healthy food, he does. He even likes quinoa, but he doesn’t like pretending unhealthy foods are good for you. It’s actually something we both have in common- you know, the “sugar-free-gluten-free-soya-free-vegan-cupcakes-that-totally-taste-like-they-have-nothing-delicious-in-them-and-are-trying-so-hard-to-be-something-they-aren’t” kind of things.

I tried to explain that I was simply substituting one ancient grain common in Central America for another ancient grain common in South America but he was having none of it. But men are fickle creatures.

So the next day I added all the ingredients together, made a salad with it and he ate seconds.

Like I said.

Fickle.

Turns out this is even better, because you can keep eating it out of the big bowl in the fridge standing up and not feel guilty about it.

This is that salad, I put a poached egg on top, because I am nearly always wanted to put a poached on top of salads but that is optional.

Quinoa Salad with Black Beans, Tomatoes, and Lime-Cilantro Vinaigrette and Feta

2 cups Cooked Quinoa

1/2 cup Chopped Cherry Tomatoes

1 small can Black Beans, rinsed carefully.

1/4 cup Cilantro, chopped

1 bunch Green Onions, thinly sliced

1/2 cup Crumbled Feta

1 Lime, zested and juiced

1/4 cup Olive Oil

1 1/2 tsp Smoked Paprika

Salt and Pepper

In medium sized bowl mix the zest, juice, paprika and oil. Add salt and pepper to taste.

In the same bowl add in all the other ingredients and mix.

Poach an egg if that’s your style. It might be. It’s my style.  

Spring Edible Vancouver!

Once again a new Edible Vancouver has come out, and once again I am so proud to be part of the team that produces it. In this issue I have an article about a croissant-a-thon that a friend and I went on, where a friend and I biked around the city eating croissants, and generally just loving life. And I wrote a small piece and recipe for asparagus and leek baked eggs. Please check it out!  

Tuesday Tutorial- Pasta Dough!

I love pasta. I used to think I would be happy eating pasta every day. It is my ultimate comfort food. When I’m sick I want pasta, when it’s cold I want pasta, when I’m celebrating I want pasta, when it’s hot out I want pasta. I love pasta.

Then I worked at a high end Italian restaurant here in town, that shall remain nameless, where we had pasta every day for staff meal. It was always spaghetti with whatever we had kicking around left over. Except that there was never anything left over, so it was always spaghetti with butter and parm. We also had a salad of leftovers alongside it, except there was never any leftovers, so he ordered in iceberg lettuce for us. It was a sad sad meal, and everyone who worked there was significantly plumper when they left than when they had arrived.

It was a restaurant full of flaws, full of some extraodinarily cruel people, and full of beautiful food for the guests, and iceberg lettuce for the staff. I felt really crappy about myself when I worked there. And for quite a while I stopped eating pasta. I had just gotten my fill.

Slowly though, it came back, and it ought to. I’m a tiny bit Italian and it manifested itself into my diet when I was very small and it never left. I love, passionately, food that uncomplicated, unfussy, that used very few ingredients, but uses the best ones possibly, to make simple beautiful food. That’s what Italian food is all about.

Which brings us back to pasta. Pasta for me is the epitimy of simple food. The combination of essentially just flour, salt and eggs makes the most gorgeous textured noodle that, at it’s best, is just graced with a sauce made of only a very few things. It is simplicity done right.

Making pasta is not complicated, it just takes a bit of patience. You don’t need any fussy equipment, you can easily do it by hand, in fact it’s very satisfying to do it that way. But in a pinch you can do it in a kitchenaid, although the dough is a bit tough and I wouldn’t recommend doing it regularly in your mixer. Apparently old ladies in Italy roll theres out by hand too, but I’m not that skilled so I have a pasta roller, a little handhelp device that costs about $30.00. It’s not a huge expense, and it’s not very large either, so it’s not too hard to store. This batch makes quite a bit, I like to dry out about half of it for later, but you could of course,

Pasta Dough

Adapted from the French Laundry Cookbook

7 Egg Yolks

1 3/4 cup (8 oz) AP Flour

2 tbsp Olive Oil

1 tbsp Milk

1 tbsp Salt

In a large bowl mix together the flour and salt. Create a well in the centre of it and add in the yolks, oil and milk. Mix together until it combines. Now put the dough onto a clean surface and knead it- push the dough out flat, fold it over and push it again with the base of your hand, pushing and folding over and over again. When the dough is ready you will be able to do the window test- Pull a small piece of dough and gently stretch it with your fingertips. If it is ready you will be able to get the dough to become so thin it is slightly translucent. If not and the dough rips, keep kneading. If you doubt at all whether or not it is done, keep kneading.

When it is done, wrap it up in plastic wrap and let it cool rest for at least half an hour, or up to overnight.

Once it’s rested set up your pasta roller. Cut the dough into quarters and cover the others carefully. On a very well floured surface roll out the dough by hand with a rolling pin to about 1/2 cm thick.

On the pasta machine on the thickest setting roll out the dough.

Now on the second thickest roll out the dough again. Keep going until the pasta machine is on setting number 3.

Flour the dough again and fold it into thirds and cut into strips for linguine. Either coat them heavily with more flour and wrap them up to use within a couple days or while they are still soft hang them up. I used my towel rack, but you can also hang them up (clean) hangers and dry them that way.  

Marshmallow Birds Nests, and Other Cute Things

 tend to have an issue with food that values being cute over being delicious. It’s just not my cup of tea. It’s not that I have a problem with food that looks sweet, but like cake pops, or cakes covered in fondant, I just don’t totally get it.

And yet… Easter. It just wants you to make overly cute things. And it wants you to give those overly cute things to the insane cuteness that is your niece and nephew.

Friends, I am obsessed with my niece and nephew. They are the kids I want one day, they are the kids you dream your boyfriends sister will have, and they are the kids you dream of babysitting. They are that cute, that well behaved, and that affectionate.

And so my thoughts on overly cute foods has been over ridden, by my love of overly cute kids.

I’m sorry.

Except I’m not really, because these are also super tasty. They are basically just toasted coconut marshmallows (delicious) with Cadbury Mini Eggs on top, and I’m not going to pretend that I’m above a Cadbury Mini Egg at Easter time. I’m totally not above it.

*PS don’t forget to enter the giveaway from earlier in the week! The winner will be decided on Wednesday!

3 pkgs Unflavoured Gelatin

1 1/2 cups Sugar

1 cup Corn Syrup, Brown Rice Syrup or Cane Syrup

1 tbsp Vanilla Extract

1 tsp Coconut Extract

2 cups Shredded Coconut, toasted*

2 tbsp Icing Sugar

3-6 drops Lemon Juice,

Cadbury Mini Eggs

*Toast the coconut by putting it on a tray in a thin layer in an oven preheated to 325F.

When it get’s nice and brown you’re in business.

Line two baking sheets with a silpat or parchment paper. Spray them with cooking spray or put a bit of a neutral oil, like canola, on a cloth and wipe it on the parchment/silpat. Marshmallows can be very sticky.

In the bowl of an electric mixer fitted with the whisk attachment, stir the gelatin with 1/2 cup of cold water. Let sit.

Meanwhile in a medium pot mic together the sugar and syrup with 1 cup of cold water. Put the lid on and over medium heat bring to a boil, stirring occasionally to make sure all the sugar has dissolved.

Once the sugar is completely dissolved take the pot lid off and turn the heat to high. Put in your candy thermometer and cook until the syrup comes to 240F

Pour the syrup into the mixing bowl and quickly turn the mixer on to medium, and then once it starts to thicken, to high.

Keep it on, after about 10 minutes your mixture will be thick and white, and starting to pull away from the edges as it turns.

It will thicken quickly so this part has got to be quick!

In a piping bag fitted with a medium plain piping tip, pipe the nest. Pipe a small circle and then go around the edges to create the sides. They will slump down a bit as they cool.

Allow to cool and harden for at least 6 hours, or overnight.

Put the toasted coconut into a bowl and put your marshmallows in, one at a time. Depending on how long you let them dry you may need to press the coconut in to make them stick. That’s okay.

Now mix together the icing sugar and lemon juice.

Dip one side of each egg into the frosting and use it as glue to stick the eggs into the nests.

AND now give them to cute small children and be merry.  

Sunday Salads- Fennel, Avocado, and Citrus Salad with Meyer Lemon Vinaigrette

image

This is the sort of salad you can only make in the winter months, and I relish fresh simple salads that can be made from things available this time of the year because frankly, in Vancouver, it’s slim pickings. But what we lack in veg right now we make up for in proxy to California, and thus California citrus. You can use any citrus in this salad, but the blood oranges and the grapefruits just make it so pretty, and if you can find a meyer lemon for the dressing, well, you’re pretty well in business.

This is one of those recipes that almost seems silly to put up here. I’ve made it so many times, and there are so few ingredients, it just seems too simple.

But when I made it for a friend of mine a while back she immediately begged me for the recipe, and wouldn’t take a “Oh, you know just chop up some fennel and add in some citrus” for a recipe.

I do that a lot. She gets mad at me.

It is though, the easiest salad to make. I grew up on this salad, sometimes it was just fennel dressed with lemon and olive oil, sometimes my mom threw in some citrus segments if she was feeling fancy. But it was a standard salad in our house for years, and it is always one of my favourites. The only thing I’ve changed is the addition of an avocado, which was totally a fluke, I just had one that was on it’s last legs so I chopped it up and tossed it in, but it turns this salad from a bright side dish, into a perfect light lunch. And when you eat as much sugar as I do, a perfect light lunch salad is just about the best thing.

image

Fennel, Citrus, and Avocado Salad with Meyer Lemon Dressing

Serves as 4 side salads.

1 Head Fennel

2 blood oranges

1 grapefruit

1 Avocado

1 Meyer Lemon if possible, otherwise a regular lemon is fine

4 tbsp Olive Oil

Salt and Pepper

In a medium bowl, zest and juice the meyer lemon. Add in the olive oil and season with the salt and pepper. Test it to see if it tastes right adding more lemon, or salt if nescessary.

Into the same bowl thinly slice the head of fennel as thin as you can, a mandolin makes quick work of this.

Cut the avocado in half, peel it and cut it into thin strips, Add that to the fennel and toss with the dressing.

Take the blood oranges and grapefuit and with a sharp knife cut the tops and bottoms off, and then cut away the skin leaving not traces of white pith behind.

Now carefully cut between each membrane, so that you cut out the segments of fruit without any bits of membrane. Put them into the bowl as well.

Toss the salad well and serve.image

Cinnamon Roll Biscuits

image

People always ask me what my favourite thing is to bake. I tell them I’m a baker and it’s the first question. And here’s the thing of it; I never know what to say.

There are things that I don’t love baking- macarons for instance, which are delicious and wonderful, are also the bane of my existance. Puff pastry, with it’s tedious rolling and folding would fall into that category, but favourites? They’re harder to come by.

But recently I’ve decided. They’re something friends always ask me to make, and then continue to talk about long after the last one has been scarfed up, and they’re something I genuinely really enjoy making.

Biscuits.

Guys, I’m willing to put it down into the internet, a place where things are never deleted. I make great biscuits, and I love making them.

The simple act of cutting in the butter, folding in the buttermilk, pressing out the dough with my finger tips. They are my favourite. I love them.

Which is a good thing, because man oh man, have I made a lot of biscuits lately. I’d say about 300 last week alone.

Oy.

See I work for a Southern restaurant which opened up last week as a pop up fried chicken shack. And what is fried chicken without biscuits? Not much apparently, because those things were flying out of the kitchen. It was all biscuits all the time.

So with the scrappy bits that were left over and a bit to tough to serve, I rolled them out , sprinkled them with cinnamon and brown sugar and rolled them up. They’re like the cookies my mom used to make with left over pie dough, except much, much, bigger and fluffier.

And seriously, those things were delicious. Like, proper, all kinds of wonderful, I will sell these one day when I open a bakery, delicious.

They were one part biscuit, one part cinnamon bun, and all parts fantastic. So there you go.

Biscuits, they are my favourite, whether for dinner, or for breakfast, or for shoving in your face when they’re covered in cinnamon and sugar and still hot from the oven.

image

Cinnamon Roll Biscuits

Adapted from the Tartine Bakery Cookbook

3 3/4 cup AP Flour

1 tbsp Baking Powder

3/4 tsp Baking Soda

1 tsp Salt

1/4 cup Sugar

1 1/2 cups Buttermilk

1 cup Butter, very cold, cut into small cubes

Filling:

1 cup Brown Sugar

2 tbsp Cinnamon

Egg Wash:

1 egg yolk

1tbsp Cream/milk

Preheat your oven to 375F

In a large bowl mix together the flour, baking soda, baking powder, salt, and white sugar.

Put in the cold butter and with your hands break the butter into pieces. You want the butter to be in big pieces and very cold- it’s this cold big butter that goes into the hot oven and causes steam which makes the biscuits rise. The pieces of butter should be somewhere between a pea and a fava bean.

Slowly add in the buttermilk and fold it in gently, adding more if you need it, to make the dough just come together. Make sure your scooping all the dry bits from the bottom of the bowl.

On a well floured surface fold the dough, flatten it out, and fold it again, about 5 times until the dough has come together nicely but isn’t getting firm.

With a rolling pin roll out the dough to about 3/4 inch thick, being liberal with the flour so it doesn’t stick.

Sprinkle the brown sugar and cinnamon on top and roll up the dough into a log.

Cut the dough into 2 inch pieces.

Put on a baking tray and refridgerate for 20 minutes.

In a small bowl mix together the egg yolk and the milk/cream.

With a pastry brush, brush the tops of the scones with the egg wash and put into the oven right away.

Bake for about 20 minutes or until the tops are starting to brown and your whole house smells incredible.

Let cool for at least 10 minutes before digging in!

Tuesday Tutorials- Danishes!

When I was little my parents had it all figured out. They decided when we were very young, that we could make our own breakfast. And on Saturdays, starting when perhaps parents would decide was too young today, we walked the block and a half to Second Cup and bought breakfast. It was a tiny cafe, part of a larger franchise in Canada, but one where they did all the baking in house. And every Saturday in the summer we would get a cinnamon danish with peach drink, and every Saturday in the winter we would get a peach danish and a hot chocolate. We were creatures of habit.

The couple that owned it were endlessly sweet to us, and we adored this little tradition. Then they hired an extremely rude girl who would serve the adults instead of us and be mean to us kids, so we wrote a very stern letter and we wrote each line in a different colour marker, so you know we meant business. And we never went back. For a few months we tried different cafes that were close to us, but it was never the same. Not long after we started making our own elaborate breakfasts which was, in fact, the beginning of a whole other exciting era. BUT there was a very sweet couple of years in which my sister, my next door neighbour and I ate danishes every Saturday. And it was a wonderful time.

Which is all a long way of saying that I love danishes. An awful lot.

Danish dough is what’s called a laminated dough, because you roll out the dough with a big block of butter in the middle. And then you fold the dough, and roll and fold and roll and fold, and as you do this the butter laminates the layers of dough. This is the same premise behind puff pastry, but here the dough is also yeasted so it rises even more, and has more flavour. The dough is similar to a croissant dough, which I might do a tutorial for soon -let me know if you’d like that in the comments!

Danishes

Makes 32 danishes

3 1/2 tsp Dry yeast

1/2 cup Sugar

1 cup +2 tbsp Milk, warmed

7-8 cups AP Flour

1 tbsp Salt

1/2 cup Butter, soft

2 Eggs

1 1/2 lb (3 cups) Butter

Egg wash (1 egg yolk and 2 tbsp milk/cream)

And your filling! I used raspberry jam- about 2 cups of it.

*This makes a very large batch, which I like because then I freeze half of it, but you can half this easily as well.

Make sure the milk is not to warm, it should just be body temperature. If it’s too hot it will kill the yeast.

Mix the milk, yeast and sugar together. Let it sit until it gets foamy on the top, about 5 minutes. If it doesn’t get foamy it means the yeast is dead, start over!

In the bowl of a standing mixer or in a large bowl if you’re planning on doing it by hand, combine the dry ingredients, only 6 cups.

Add in the yeast-milk mixture in and combine until it starts to come together. If it is still very wet add in a bit more of the flour until the mixture is still soft but not sticky.

Add in the 1/2 cup soft butter bit by bit until it is fully combined, and keep mixing until the dough does the window test- when you take a small bit of dough and stretch it slowly in your hands, it gets so thin you can see through it. If it doesn’t keep mixing!

Now form the dough into the a ball and put it in a clean bowl, cover it with a clean tea towel and let it rise until it has doubled in size, about an hour.

In between two sheets of parchment roll out the butter into a square about 1 1/2 inches thick, put it in the fridge.

On a well floured surface place the ball of dough. Cut 4 slits into the dough at 12-3-6-9 o clocks, about half way in.

Now roll it out- so that you form a large x shape.

Put the block of butter into the middle

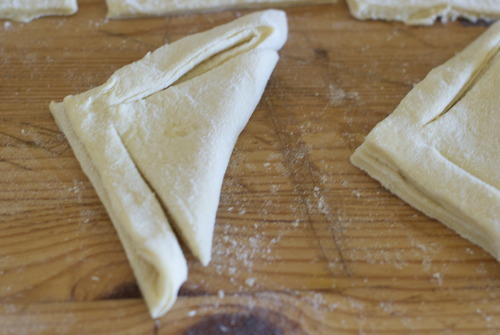
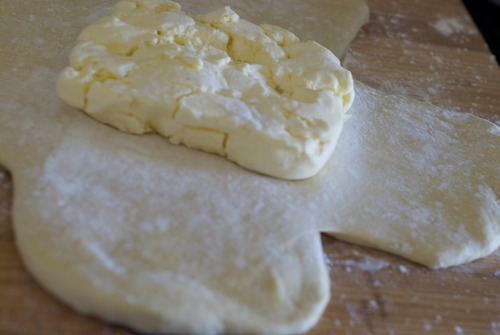
and fold the other pieces on top of it to seal it in.

Flour your surface again and place the folded side down.

Roll out the dough to a large rectangle, being careful to make sure the dough is rolled evenly and keeps it’s rectangular shape.

Now fold the dough in thirds like you were folding a letter.

Wrap up this piece of dough, put it on a baking sheet and put it in the fridge for twenty minutes.

After it has chilled repeat this twice more, rolling, folding, and chilling.

Let the dough chill for another 40 minutes.

At this point I cut the dough in half and put half of it in the freezer, but if you are making a large batch you can use it all!

Now roll out the dough! Roll it until it’s about 1/3 inch thick into a large rectangle. You can make any number of shapes with this dough now. Here is how I like to do it best.

Cut it into squares- half a batch of this dough will make 16 danishes.

IMPORTANT! The way you cut the dough will make or break your danishes. You must cut straight down. DO NOT twist a cutter or slice through. Cut straight down. Otherwise your layers will be sealed together.

SO I cut them into squares, then fold them diagonally.

Cut slits in them so that the outsides are disconnected from the middles except on two opposing corners. Unfold them and put them on a parchment lined baking sheet.

Brush with egg wash like I’ve shown here

And fold the pieces over.

Now fill them up with whatever filling you have. I used raspberry jam.

Let them sit until they have puffed up nicely, about another 45 minutes.

If there are some scrappy bits of dough from the edges, I recommend sprinkling some cinnamon and sugar on them and rolling them up into straws. You can proof and cook them along with the others no problem.

Meanwhile, preheat the oven to 375F

Use your egg wash once again to brush the tops of the danishes.

Bake until the dough is nicely browned, about 20-30 minutes.

Allow to cool a bit before eating- and I like to top up the middle with some more jam!

And that’s that!

Sunday Salads- Thai Style Coleslaw with Lime and Peanuts

Here’s the thing of it: I work almost all the time, and always at weird hours. It’s just the way my life is these days. Somedays I start at 5am and some days I finish work at midnight, which has lead me to some very strange eating patterns. Most of them involve a whole lot more sugar than I will ever admit to on this very public forum because, if we’re being real here, I’m totally unwilling to admit it to myself.

But I struggle, as I know a lot of people do, with working long hours and trying to eat vegetables at the same time. Some people, like my sister, buy their veggies pre-cut because it saves time. But you get totally subpar vegetables if they were cut 5 days ago, so I’ve resisted this, and instead, I’m getting into salads and things that aren’t full of delicate greens, but instead are full of hearty veg that stay crisp even when you dress them. The sort of salads that you can make in a big bowl and continue eating for a couple days. The kind of salad that eat with dinner on Sunday night and eat left overs for Tuesday lunch in between your baking shift and your serving shift when your too exhausted to much of anything but eat and sleep.

And if you’re that tired, as I seem to be an awful lot lately, I figure it’s better to eat coleslaw than it is to eat left over meringues. Especially if said coleslaw isn’t the Southern mayo kind, but the Asian sort, dressed in nothing but lime, soy, and peanut oil.

Thai-Style Coleslaw

1/2 head Purple Cabbage

1 bunch Green Onions

1/4 cup Cilantro

1/2 cup Roasted Peanuts, peeled

Juice of 1 lime

2 tbsp Peanut Oil, or other neutral oil, like Canola

1 tbsp Soy

Fish Sauce, optional, to taste.

Mix together the lime, soy, and fish sauce if using in a large bowl. Add in the oil and taste to check the seasoning. Adjust if you need it (I used a bit more soy, but I am a salt fiend…)

Thinly slice the cabbage by hand, using a mandolin, or the slicing attachment of a food processor.

Add it into the bowl with the dressing.

Thinly slice the green onions on a bias and mix them in too.

Chop the cilantro and the peanuts and put them on the top.

C’est finis, so simple, and so delicious, and it will keep getting better for about 3-4 days in the fridge.