Rigatoni with Ground Bacon, Braised Leeks and Spinach

urban digs ground bacon pasta livia sweets

My favourite thing about the farmers market, bar none, is the end of market barters.

The markets are exhausting for me, I start my day at midnight and usually get home around 4 in the afternoon. But last week I brought home a box of cherry tomatoes, a bag of new potatoes, the prettiest little zucchinis, a bison steak, a bunch of carrots, two bunches of beets, and some show stopping sunflowers. And there are few better ways to motivate me through a long market than a promise of produce at the end.

I love it for the obvious reason- delicious local treats- but also because it gets me talking to people at the markets that maybe I wouldn’t normally, or who set up too far away from me than I don’t end up seeing them. And my favourite example of this is the exceptionally lovely Jess, who runs the markets for Urban Digs.

Urban Digs is pretty magical place by the sounds of it- it was started by a couple, Julie and Lugo who raised some hogs, and since opening they’ve expanded to a new farm not too far from the city, and they sell bison, beef, lamb, and chicken from other organic free range farms that they’ve partnered with. I can tell you unequivolcally that it’s really good meat.

So when Jess told me a couple weeks ago that I should try their ground bacon I was super intrigued. It should surprise no one that I put it in pasta.

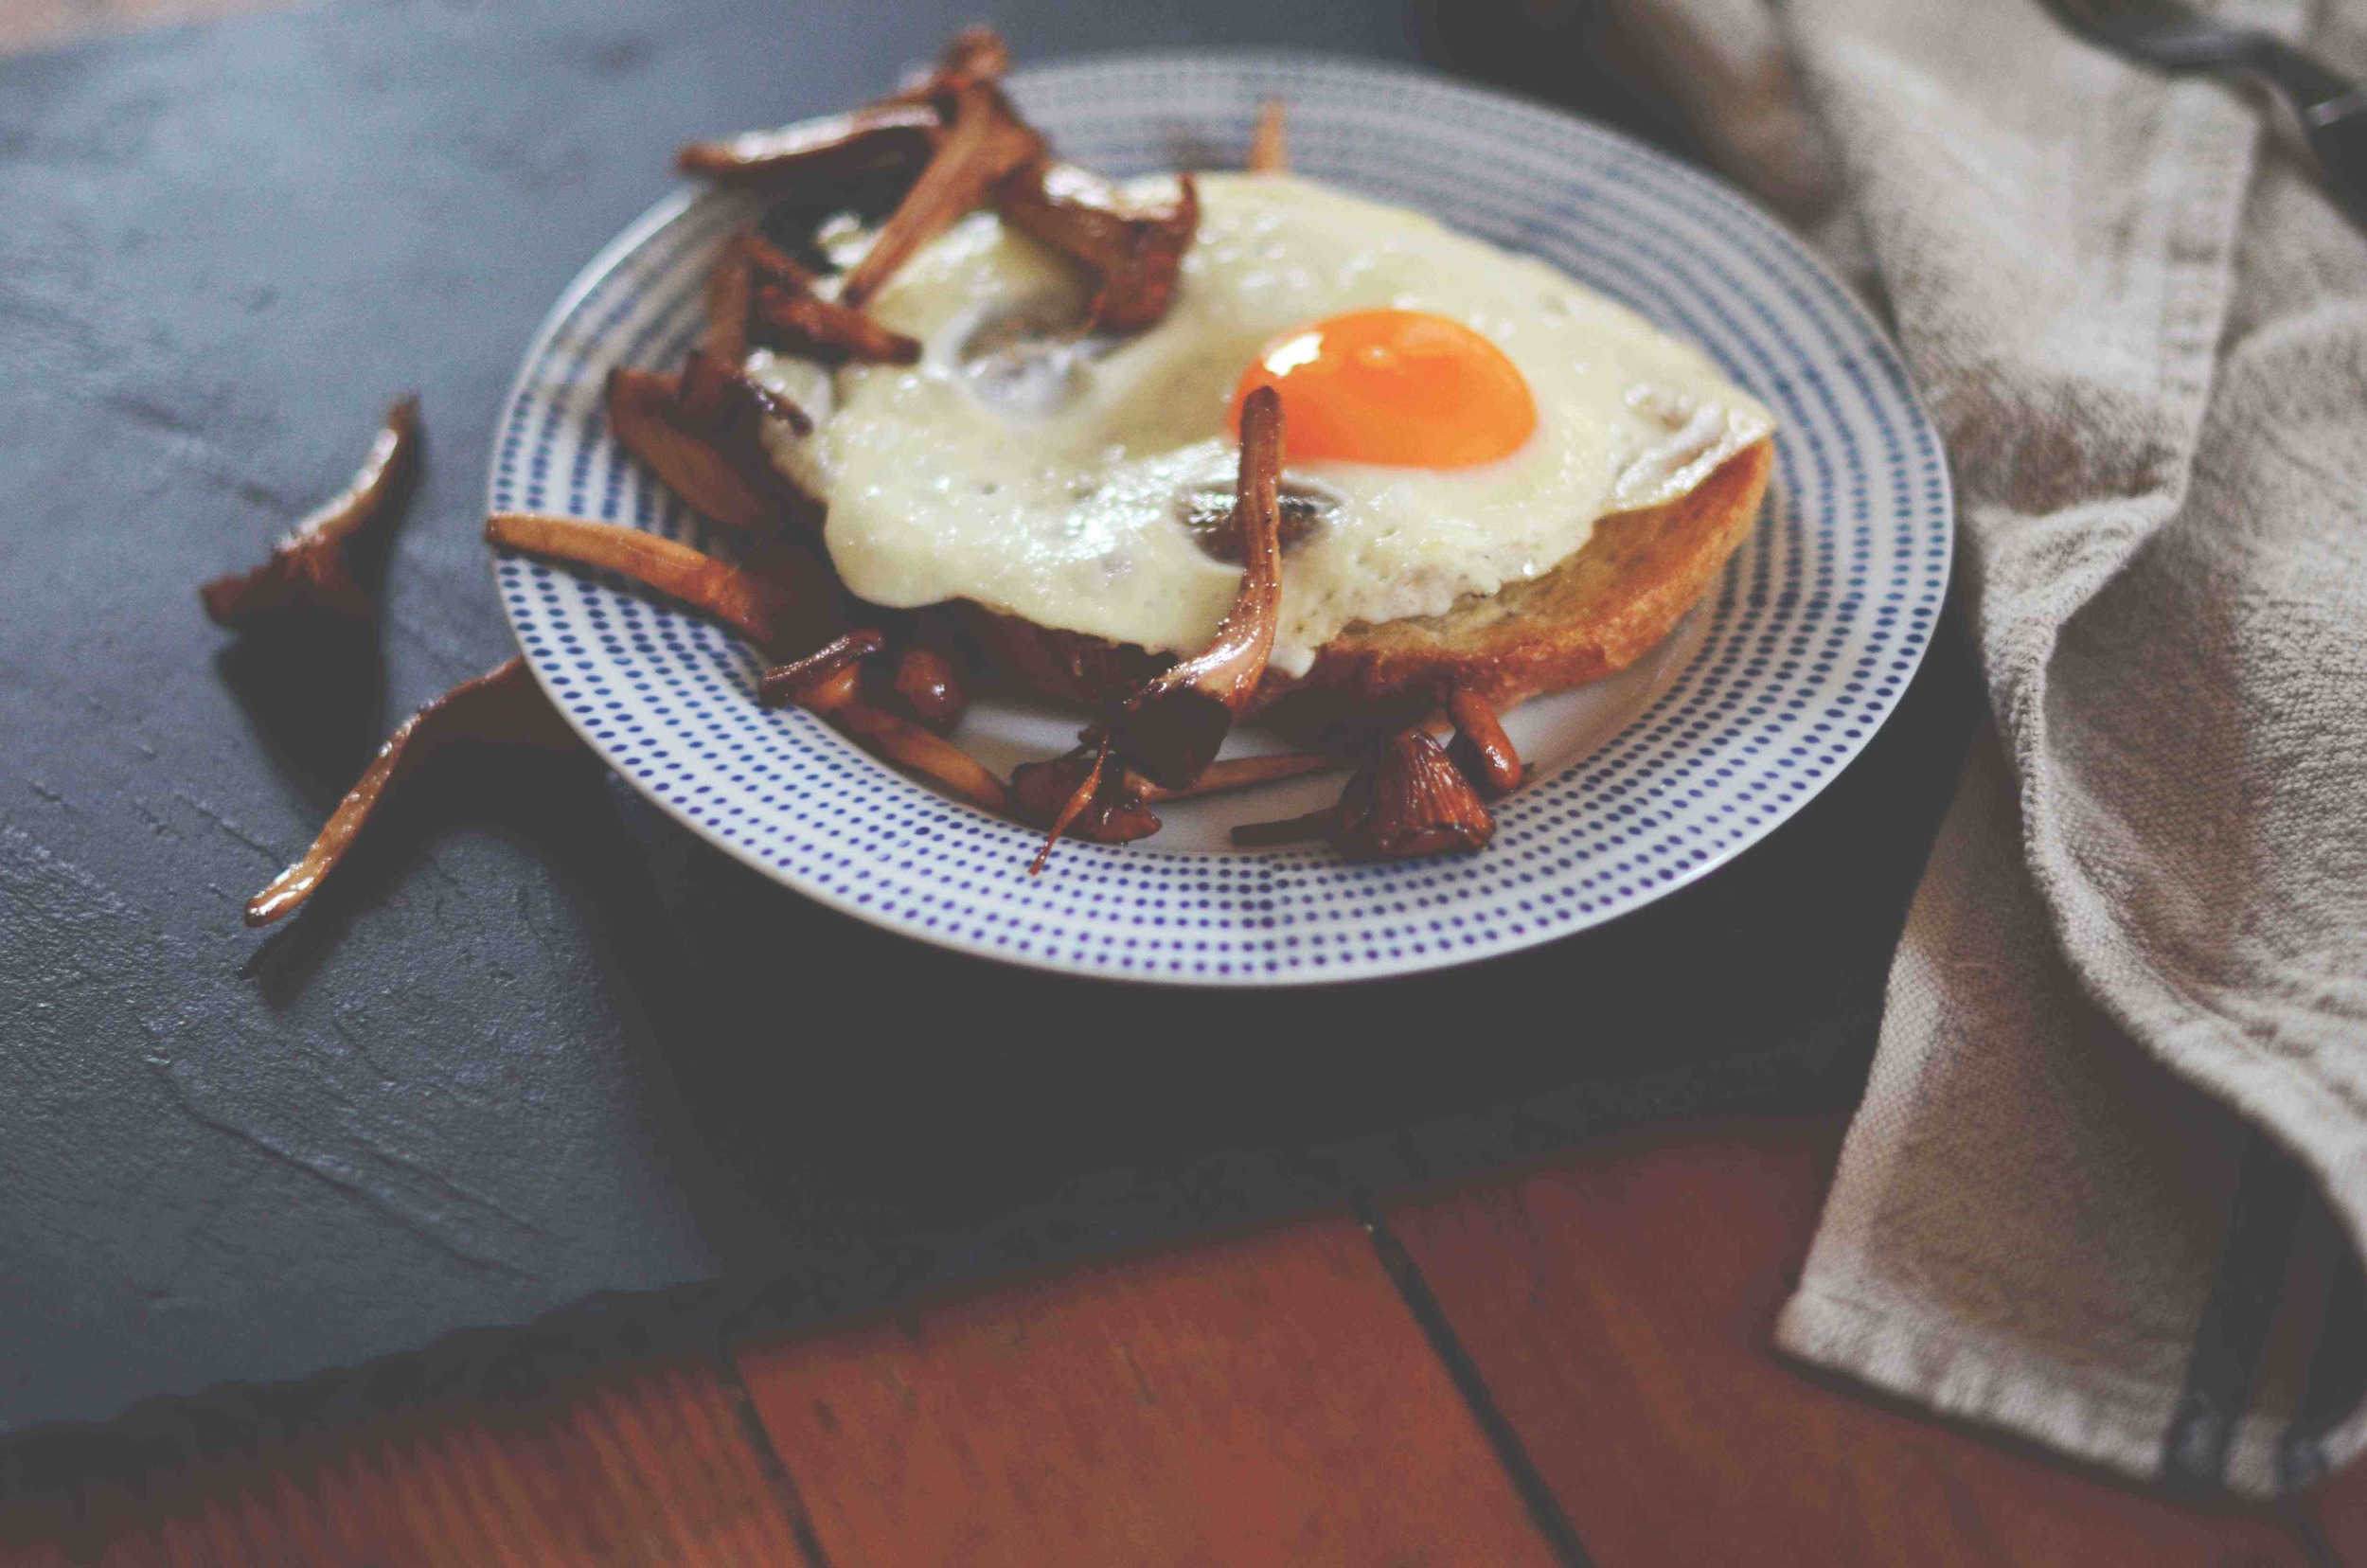
But before I did that I cooked down a slew of leeks with white wine and lemon and garlic, and after I sautéed the ground bacon I added in some spinach and a wack of parsley. It’s bright and zippy, and has the most sparkly bits of smokey pork woven through it.

You can get Urban Digs meats at the Farmers Markets, but you can also buy a huge selection of things online. AND if you use the code “liviasweets5” you’ll get $5 off your purchase, which is pretty wonderful if you ask me.

Almost as wonderful as this pasta. xo


Pasta with Ground Bacon, leeks and spinach

1lb Rigatoni

3 Large Leeks, cut in half lengthwise and then cut into slivers

1 bunch Spinach, cut into ½ inch thick slivers

2 cloves Garlic, thinly sliced

1 tsp Chilis (optional)

Zest and Juice of 1 Lemon

½ cup White Wine

Handful of Parlsey, finely chopped.

2 tbsp Olive Oil

1 lb Ground Bacon

Salt to taste

Parmesan to the top.


Warm a large sauté pan over medium heat.

Add in the bacon and stir until it’s cooked throughout and has browned a little.

Pour the bacon into a dish and rinse out the pan. I found mine gave off very little fat, but if yours does you can strain it if you’d like.

Warm the pan again over medium heat, this time add the oil.

Add in the leeks- I added in about half of mine, let them wilt a bit, then added in the rest, even in my huge sauté pan, and that’s okay if you do too.

Once they’ve all wilted add in the wine, a pinch of salt, chilis, the lemon zest and juice, and the bacon. Cook for about 15 minutes, until the leeks get silky in texture.

Meanwhile bring a large pot of salted water to a boil.

Cook the pasta according to the package directions.

Just before the pasta is fully cooked, add the spinach and parsley into the leeks so they begin to wilt.

Strain the pasta and toss it into the leek mixture. Season to taste and serve immediately, with a heavy portion of parmesan.


Freekeh Salad with Radishes, Sprouted Cabbage and Halloumi

Here’s the thing of it: I love pasta. I love pasta always. I love it to the point where I, not infrequently, make it for breakfast. Not just eat leftovers for breakfast, but actually make a fresh pot of pasta. Before 9am.

It’s a problem.

Normally I’ve balanced this obsession with working a very active job.  In kitchens or serving in restaurants, you’re required to run around like a crazy person for at least 6, and up to 14 hours a day. But since working for myself, two days a week are spent almost entirely in a car. One day a week I’m on my feet but mostly sedentary, at a farmers market booth.

So I’m trying to make some healthy changes. Do I want to eat pasta 4 nights a week. Without question. But I’m trying guys. I’m trying.

This salad is a solid replacement. It’s warm, high in fat (good fat mostly!), filled with protein, and most importantly, it’s full of flavour. It’s super fresh tasting from the lemon, but the cumin and coriander round it out. The nuttiness from the freekeh is balanced wonderfully with the salty fried cheese, and I love the crunch of the radishes and the cashews. On top of it all it fills me to the point where I don’t dream about pasta 30 minutes after consumption. Which is pretty great in my books.


Serves 4

2 cups dried Freekeh

2 tbsp neutral oil (canola, avacado etc.)

Juice of 1 large Lemon

¾ cup Extra Virgin Olive Oil

1 tsp Ground Cumin

1 tsp Ground Coriander

1 clove Garlic

1 bunch Radishes, cut in halves or quarters, depending on size

1 bunch Cabbage Sprouts- or Broccoli Rabe, or Broccollini, whatever you have!

½ cup Cashews, roasted and coarsely chopped

1 package Halloumi, cut into ½ inch thick slices.

1 large avacado, cored, peeled and sliced.


Bring a medium pot with 4 cups of water to a boil. Add freekeh in with a healthy pinch of salt. Bring to a simmer, put the lid on it, and turn the heat to low.

Cook until all the water has evaporated, about 20 minutes.

Mince the clove of garlic finely, (I smash them up with a pinch of salt, you can do that or not- up to you!)

In the bottom of a large bowl mix together the garlic, lemon, cumin, coriander and a pinch of salt.

Slowly whisk in the olive oil. It will look like an enormous amount of dressing, but the freekeh will absorb tons of it. Adjust for seasoning- adding a bit more acid or olive oil or salt depending.

Add the cooked freekeh and radishes to the dressing.

Cut the cabbage or broccoli into 2 inch pieces. Heat a large pan (preferably cast iron) over medium high heat.

Add 1 tbsp of the neutral oil and then add in the cabbage or broccoli with a healthy pinch of salt. Toss a few times and cook for about 5 minutes, or until the the stems are cooked and some of the leaves are nicely browned. Add them to the dressing.

In the same pan, add the remaining oil. Lay the halloumi out and fry until it’s nicely browned, then flip it over.

Remove from heat and cut into strips.

Serve freekeh in 4 bowls, topped with the halloumi, sliced avocado, and cashews.


Soba Noodle Salad with Citrus and Ginger

soba-1.jpg

Well friends, I’ve finally done it. Done that simple thing that nearly all the adults in the world can do, that, well,  most teenagers can do. That thing that I have been avoiding like the plague for over a decade. I learnt to drive.

I spent the money, took the classes, practiced in our manual car, nearly broke up my pending nuptuals, but in some small miracle, I learnt how to drive.  I’m feeling pretty pleased with myself.

soba-7

Jordan however decided to celebrating by getting  a vicious flu. The kind that makes his workaholic self completely stop. He has probably slept for 20 of the last 24 hours.   I on the other hand, am currently spending most of my days mind-over-matter-ing it, in an attempt not to get what he’s getting. And to aid in my attempt to refuse to allow bacteria into my body, I’m also eating kind of insane amounts of vitamin C.

Not just vitamin C though, the internet has led me to believe that I need not only citrus in IV form, but also garlic, ginger, and spicy food. So here is the garlick-iest, ginger-iest, spiciest, and citrus-y salad you’ll ever need. It’s all the immune boosters in one so that we all don’t end up curled up in a ball watching terrible TV.  I for one like to be in fine form when I watch bad TV.

Soba-5

Citrus and Ginger Soba Noodle Salad

2 bundles of Soba Noodles

Juice of 1 Lime

2 Oranges, segmented.

4 Radishes, thinly sliced.

2 stalks Celery, sliced on a bias.

1 clove of Garlic, minced

1.5 inches of Ginger, grated finely

2 tbsp Siracha, or other chili sauce

¼ cup Sesame Oil

3 tbsp Soy Sauce

2 tbsp Sesame Seeds (black or white)

Bring a large pot of water to a boil. Season liberally with salt.

Cook soba noodles according to package instructions, or until al dente.

Strain, and immediately pout cold water over top and woosh it around with your hands or a spoon to cool it all down. Set aside.

Meanwhile, take your minced garlic put it near the edge of your cutting board. Sprinkle a small mount of salt on top. With the side of your knife, crush the garlic until it is pureed. Put it in a large bowl.

Add in the ginger, lime juice, soy sauce, and chili sauce.

Whisk to combine, then slowly add in the sesame oil. Taste, and add more citrus, oil, or soy as needed.

Add in all the remaining ingredients. Toss to fully combine and serve immediately, or cover and keep in the fridge for up to 2 days.

xo

soba-and-kitten

Spaghetti Carbonara with Poached Eggs

breakfast-carbonara-4.jpg

I mentioned this in my last post, and I feel a bit weird about announcing it over the internet, but here goes: Over the holidays Jordan proposed, and I said yes. It has been a magnificent couple of weeks, full of celebrating with friends and family. Jordan told me that the wedding is off if I go on a “wedding diet” and I assured him that it wouldn’t happen, because it can’t happen. Because everywhere I turn these days someone is pouring me a glass of bubbly, and then refilling it, and then refilling it again. Let me tell you friends, it is hard to stay sober when you’re recently engaged.

So this post is against all the new years resolutions, and against the very principle of a wedding diet, because it is hang-over food.

Spaghetti Carbonara, or “bacon and egg bascetti” as I used to call it when I was wee, it basically just that- bacon, eggs, parmesan, and loads of black pepper. You don’t need to cook the sauce, it cooks as the it’s tossed with the hot pasta. You can easily make this without the poached egg of course, but there is something about adding that makes the pasta feel like breakfast. Which is sometimes just the ticket.

breakfast-carbonara-2


Spaghetti Carbonara with Poached Eggs


1 lb Spaghetti

7 Eggs (use good quality free range organic ones, it really will make a difference)

400g Bacon (good smoky stuff please!)

200g Parmesano Reggiano, or Grana Padano

Salt and Pepper


Cut the bacon into ½ inch pieces and cook them in a small frying pan over medium heat for about 15 minutes, or until they are crunchy, but not burning.

Strain the fat off into a jar of can. Put the bacon aside.

Fill a large and a medium sized pot with water and bring to a boil.

Meanwhile grate the parmesan and mix it in a large bowl with 3 of the eggs and healthy cracking of black pepper.

When the large pot of water comes to a boil, season it liberally with salt and cook the pasta to the directions on the package.

Just as the pasta is done and you’re about to strain it, crack the eggs into the remaining medium sized pot.

Strain the pasta and add it, and the bacon to the egg and parm mixture. Stir vigorously until it has completely combined, making sure it doesn’t curdle.

Divide among 4 bowls.

Using a slotted spoon remove the eggs from the water- testing to make sure they are done by gently poking at the yolk and white with your finger, ensuring that the white is hard but the yolk is soft.

Put the eggs on top of the pasta and enjoy immediately!

breakast-carbonara-1

New Years Fun!

fake-new-years-cheersing.jpg

fake-new-years-sparklers fake-new-years-mini-donutsfake-new-years-group-shot-1 I have been thinking about what to write on this post for a while now, how to talk about my excitement from the last year, how much has changed, how new and shiny everything has seemed, and I keep coming up short. It has been one of the most hectic and crazy and rewarding years I can think of. I have had quit my job, started a business, moved apartments and got a kitten. And as of a week ago, I am also engaged.


fake-new-years-justinefake-new-years-10fake-new-years-macarons

It has been one of the most exciting years I can remember, and to mark it’s occasion a month or so ago I invited some of my girlfriends over to wear sparkly dresses, eat pastries and dance around pretending it was New Years Eve. So here are the pictures, to flip through as you’re putting on your own sparkly dresses and hoping for a spectacular new year. I so hope you’re year has been as wonderful and challenging as mine!


fake-new-years--jenn-eating-a-macaron


HAPPY NEW YEARS!


Xo Claire

nye-3

Chocolate Chip Peanut Butter Cookies

peanut-butter-cookie-3.jpg


If you are lucky enough to actually like the family you were born into, I highly recommend not leaving the city they live in. Because if you do, the chances of you falling in love are very high. With a person, or with a city, or with a job and then you will be stuck. Stuck in a city, with a person and a job that you are in love with, which is, by most measures, is a pretty fabulous situation to be in. But if you are lucky enough to actually like the family you were born into, there will always be a part that is missing.


That’s how it is for me at least. I absolutely love Vancouver, and I can’t put into words how wonderful Jordan is, and I get giddy every time I think about how I work for myself. But it is tough sometimes, and never more so than right after I’ve visited home.  I’ve been super lucky lately, my Mom came out to visit this summer for a whole week, and then I got to visit my whole extended family in Boston a month ago, and last weekend I was back in Toronto for a family wedding. By all accounts, I’ve seen more of my family than I usually do, but somehow that just makes it harder. It’s always so perfect when we’re all together, and now I’m here thinking about how I’m not sure when I’ll see them again, Which is a miserable situation.


And whenever I’m this hopeless and lonely, the only thing that does any good is to make cookies. Not fussy cookies, not fancy cookies, and not anything wild or crazy cookies. The kind of cookies I can imagine my Mom baking, the kind that you just drop on a pan and they turn into soft and caramel-y and glorious sweet bits of comfort that make everything a little bit better.


These cookies in particular are especially comforting. They are full of brown sugar and chocolate and copious amounts of peanut butter and sprinkled with Maldon salt on top for crunch. It will make you feel better when you’re sad, and that’s about all you can ask for from a cookie I think.


peanut-butter-cookie


Chocolate Chip Peanut Butter Cookies


1 cup Butter, room temperature


2 cups Brown Sugar


2 Eggs


1 ¼ cup Peanut Butter


2 tbsp Vanilla Extract

2 1/2 cups All Purpose Flour


2  tsp Baking Soda


1 ½ cups Chocolate Chips


Maldon Salt for sprinkling.


Preheat oven to 400F.


Cream together butter and sugar.


Add the eggs one at a time stir in between.


Slowly mix in the peanut butter until it is totally combined.


Mix in all the other ingredients except the Maldon salt. Chill dough for an hour.


Line baking sheets with parchment paper or a Silpat.


Roll dough into 2 tbsp pieces. Press them down a bit on top and sprinkle them with maldon salt.


Bake for 8-10 minutes until they are slightly browned but still very soft in the inside.


Cool for at least 20 minutes before eating too many at once!

Chanterelle Mushrooms with Fried Eggs on Toast

mushroom-toast-2-LQ.jpg

Here’s a secret- I’m really not so into Fall. I know, I know, everybody loves fall. But I live in a city that rains 8 months of the year and when the weather gets colder I start to feel the panic of not seeing the sun for months on end and I get cranky.

The only upside to fall for me, is apples and mushrooms. Which as I write it this seems like a very strange pairing. But thems the facts; Apples and mushrooms.

mushroom-toast-5 LQ

And when talking about mushrooms, I mean the foraged versions that are in all the shops in my part of town right now. Mostly, pine mushrooms and chanterelles.

The combination of which I am currently putting on everything. I’m sautéing them and tossing them into pasta, putting them on pizzas, but mostly, I’m putting them o buttered toast and topping them with a fried egg.

It’s a glorious way to start a day, but also a glorious way to eat lunch or dinner. Mushrooms, eggs, and buttered toast. It’s a beautiful thing.

mushroom-toast-10 LQ

Fried Eggs with Chanterelle Mushrooms on Toast


4 pieces of Sourdough Bread

200g Chanterelles and Pine Mushrooms

2 Cloves Garlic, minced

¼ cup Butter

2 tbsp Olive Oil

4 Eggs

2 tbsp Flat Leaf Parlsey, chopped

Clean the mushrooms- using a pairing knife scrape off the edges of stems of the mushrooms. Then scrape any dirt off the tops of the mushrooms- a knife works, and so does a pastry brush. Once they are clean break them apart with your hands into ½ inch pieces.

In a medium sized frying pan over medium heat, warm up the olive oil and 1 tbsp of butter. Add in the mushrooms and saute until just starting to brown. Season liberally with salt.

Add the garlic, saute until just fragrant. Toss in the parsley, and then put the whole thing into a bowl.

Rinse out of the pan, put it back over medium heat and warm up another 1tbsp of the butter. Crack the eggs into the pan and let cook until the whites are fully cooked and the yolks are still runny.

Meanwhile toast and butter the bread.

Put the toast on the plates, divide the mushrooms on top of the toast, and put an egg on top of those.

Eat!mushroom-toast-8 LQ

Seared Eggplant with Macedonian Feta and Za'atar

eggplant-8-LQ.jpg

Eggplants are a wildly underestimated vegetable.  

Here’s the thing of it: I love eggplants.

Here’s the other thing of it: I’m one of the few.

Here’s why: There are a lot of bad eggplants out there.

There are a lot of hothouse eggplants, a lot of flavourless eggplants, a lot of eggplants that pretty much just taste like soggy bitterness.

Here’s the other reason why: There are a lot of people who don’t know how to cook eggplants properly. They cook them until they get stoggy, or they don’t cook them enough. Or they cook them with water so they lose any hope of a nice texture.

And all of this may have led you to thinking that you don’t like eggplants and that it’s hard to cook, and the thing of it is, it’s super easy, the trick is lots of olive oil, high heat, and a healthy pinch of salt.

I’ve known this all for a while, but it took Jordan eating eggplant at our favourite Palestinian restaurant to convert him. There it comes grilled with halloumi, and the most puckeringly perfect lemon and za’atar dressing that you soak up with loads of extra pita. (Za’atar is a middle eastern spice mix with dried savary, thyme, sumac and sesame seeds.) It’s perfect in every way.

This is my version of that dish. I sear the eggplant instead of grilling it, because I don’t have a grill. Knock you’re socks off and use the BBQ if you have one. I also use Macedonian feta instead of halloumi, because I am royally obsessed with the Macedonian feta at my local cheese shop, and I want to put it on everything. But if you can’t find it (it’s a thousand times creamier than regular feta) feel free to use the halloumi.eggplant-6 LQeggplant-4 LQ

Eggplant with Macadonian Feta and Za’Atar

6 Small Eggplants, ot 1 Large, sliced into inch thick slices.

250g Macedonian Feta, or Halloumi

1 Lemon

¾ cup Olive Oil

¼ cup Canola or Avacado Oil

1tbsp Za’atar

1 small clove of Garlic, minced or pureed.

Salt and Pepper

Heat a cast iron pan over medium heat .

Mix together the canola oil with ¼ cup of the olive oil.

Pour a good splash of that into the pan, and put in a layer of the eggplant, salt it generously.

Let it cook until the eggplant browns then flip it and let it brown on the other side salting it too, adding more of the oil mixture if neccessary. The eggplant should now be very soft.

Remove it, add more oil into the pan and cook the remaining eggplant.

Slice the feta and layer it with the eggplant on a dish.

Make the dressing: mix the juice of half the lemon, garlic, and a good pinch of salt.  Slowly add in the remaining olive oil. Check for seasoning, and add a bit more olive oil, salt or lemon as needed.

Pour that generously over the eggplant, sprinkle the za’atar over top and serve!

Seven Minute Eggs with Roasted Corn Butter Lettuce Salad

pic-3.jpg

It has been a glutinous couple of weeks. It’s been full of stagettes and weddings and far more champagne then any one person should consume. There have been an excess of sparkly dresses, gold shoes, and red lipsticks. There have been charcuterie plates, and cheese plates, and seemingly endless amounts of pizza and I am in need of vegetables in a major way. Which is why, after returning from a wedding this weekend I made this for breakfast the next day. It’s richly satisfying, full of flavour, but also full of the nutrients that only found their way into my diet in the form of Ceasars and Bloody Mary’s over the last few days.

pic-1

Boiled Eggs with Roasted Corn, Avacado, and Butter Lettuce

For 4 People

2 Cobbs of Corn

1 Avacado, peeled, cored and sliced.

1 Small Head of Butter Lettuce, torn into pieces, and cleaned.

Half a Lime

¼ cup Olive Oil

3 tbsp Grapeseed Oil

1 tsp Sambal Olek

250g Cherry Tomatoes, cut in half

A small handful of cilantro, thinly sliced.

4 Eggs


Grill corn- Preheat you’re grill, or grill pan. Husk the corn and grill it until it begins to char. Turn it over as chars until it’s cooked throughout.  Let it cook and cut the kernels off.

Bring a pot of water to a boil. Dip the eggs in with a slotted spoon, twice. Then carefully lower them into the pot. Set a timer for 7 minutes. Remove the eggs after the 7 minutes and pour cold water on them until they are a bit chilled.

In a large bowl mix together the sambal, lime juice and a healthy pinch of salt.

Whisk in oil slowly until it’s all combined. Add in all the other ingredients except the eggs.

Peel the eggs and cut them in half.

Portion the salad between 4 plates and put the eggs artfully on the side.


Big Changes.

me-dancing-3.jpg

Do you ever have one of those months where you blink and suddenly it’s gone. Or you feel like you turn around and out of nowhere everything has changed? That’s been this whole summer for me.

I moved, after 7 years in my old apartment, to one that is a whole lot bigger, and lovelier. I quit my job, so now I am officially self-employed, which is so exciting and terrifying and amazing. My business is starting to get going, and I’m getting more clients and doing more markets.

It’s been a crazy time, and one that has ensured that I haven’t had time for this lovely little space here.

So I just thought I’d let you know that I’m going to becoming back with regular posts, and lots of new recipes.  I promise.

So what about you? Any big changes happening in your life this summer?

Me--dancing--5-LQ

Buckwheat Blueberry Pancakes

pancakes-7.jpg

I have not been healthy lately. Like, not even a little bit. It’s been parties, and stagettes, and friends visiting from out of town, and dinners out with said friends, and far too much wine and too many gin and tonics with the same friends. It’s been a great summer so far, but it’s not so good for my health. So I had one of those days when I was thinking that I would be super healthy, and work out, and eat vegetables , and all those other things you’re supposed to do when you’ve been eating too much cake. But then instead I thought about blueberry pancakes and healthiness went out the window. Tomorrow guys. Tomorrow I’ll be better. Today, there are pancakes, and that is good enough my friends. And their gluten free, so it’s like healthfood right? Yep. Totally.

pancakes-2

Buckwheat Blueberry Pancakes

1 cup Buckwheat Flour

1 ¼ cup Buttermilk

1tsp Baking Soda

1tsp Baking Powder

2 tbsp Brown Sugar

½ tsp Salt

1 Egg

1 cup Blueberries

Neutral oil to fry them (like canola, or avacado oil)

Maple Syrup


Mix the buttermilk and egg together in the bottom of a large bowl.

Add together all the dry ingredients and pour them into the bowl. Mix them together until they are just combined. Add the blueberries.

Heat up a frying pan over medium heat, if you have a cast iron pan that works best.

Add in the oil and spoon the batter into the pan in small circles.

When bubbles appear on the surface flip the pancakes.

Wait another minute or two and then take the pancakes out of the pan and onto a plate. Keep this up until all the batter has been used.

Slather with syrup and enjoy.

Radish and Watercress Tartines with Goats Cheese

tartine-1.jpg

  And… it’s wedding season.

Officially. Two weeks ago I went to the first of 4 weddings that I’m attending this year. Last year there were only 2, but the year before that there were six.  Being in your late twenties guys, you go to a lot of weddings.

The difference this year is that all of the weddings are for people who I am super close to. I’m in two bridal parties, I’m making the cakes for all of them, because they are some of my best friends. And when that happens it’s not really just the wedding, but the showers, and the engagement parties, and the stagettes.

I’m throwing a shower for my bestie next month, and she’s vegetarian, so I’ve been trying to think of cute simple tea sandwiches that will look gorgeous, be a bit different and are meat free. My local market had these beautiful little French radishes, and some lovely watercress, and with a bit of goats cheese it seemed like just the ticket.

1 Baguette

250g Aged Soft Goats Cheese

4 French Radishes, very thinly sliced lengthwise

1 bunch Watercress

Olive Oil for Drizzling

Good Flakey Salt (Like fleur de sel, or maldon)

½ Lemon


Preheat your oven to 425

Cut the baguette in half lengthwise, put the pieces into the ovens and toast lightly.

Spread the goat cheese onto both pieces of toast.

Pick the sprigs of watercress and layer them on the goats cheese.  Place the radish slices on top, drizzle with olive oil. Squeeze the lemon on top, and sprinkle with salt.

Cut the baguettes in quarters, and serve.


tartine-2

Sriracha +Maple Roasted Pecans

pecans-1.jpg

Here’s the thing: I have not been blogging enough lately. This little part of the internet has been in my thoughts so much these days, but I haven’t actually been writing and photographing and putting up here. It’s gotten a bit lost. I’ve been writing and photographing for other people. People like Edible Vancouver and the Vancouver Observer and HelloGiggles. But not here.

And I’ve been baking a lot too, for Merchants Oyster Bar, which just got a great review in the Globe and Mail, and even if the woman reviewing it made it sound like the chef was making the pastries, it was me, and she said nice things.

But mostly I’ve been baking for Livia Sweets the company. The super-exciting-can’t-contain-my-smile-when-I talk-about-it company that I own. That I make pastries for and sell. That people buy, and say nice things about on the internet. That fills me with so much joy I can barely handle it.

I’ve also been working hard with a design team to get this website spick and span with a new look, updated pages, lots more pictures of myself (which I’m a bit self conscious of truthfully) and that’s much more user friendly. You can leave comments again now! I can update the recipe index! I can add pages about my exciting new projects! It’s a lot of big improvements.

It’s been a very busy couple of months, the kind that knock you over sideways a bit and make you so exhausted that you end up getting strep throat that makes you cough so hard you have to take all sorts of herbs, and watch an entire season of Nashville in one week just get better.

But now I’m feeling pretty good. I’m feeling pretty on top of things. And I’m going to ease you into a recipe with this one because it’s so painfully easy it feels like a cheat to give it to you, except you would all hate me if I didn’t because it’s so darn good. It’s crunchy and salty and spicy, but also earthy and sweet and exactly what I want in a bowl of pecans on my table. And also on my friends table because I’ve already been enlisted to bring her some after she saw my instagram picture of them only a few minutes ago. They are wonderful. And so are all of you, thank you for your patience these last few weeks.

pecans-2

Sriracha and Maple Roasted Pecans


2 cups Pecans

½ cup Maple Syrup*

1 tbsp Sriracha

2 tsp  Coarse Salt

*If you think maple syrup is a bit indulgent, or you just don’t have any kicking around, you can easily substitute honey or brown rice syrup, and it was be nearly as delicious.


Preheat your oven to 325F

Line a baking tray with parchment paper.

Mix together all the ingredients with your hands in a medium sized bowl and then sprinkle them out on the parchment lined tray and spread them out.

Bake for about 20 minutes, stirring every 5 minutes.

You’ll know they’re done when the sugar around them has stopped bubbling but instead looks crystallized onto the nuts.

Cool, and try not to eat them all in 5 minutes.


Spaghetti with Roasted Tomatoes, Smoked Mackerel and Arugula

spaghetti-2.jpg

Lately I’ve been doing that totally pathetic thing that nearly all women do in Spring, The terrible season that forces us to realize that everything we’ve eaten from Thanksgiving turkey to Valentines soufflé has taken it’s toll. And now that we’re expected to go to beaches and lie around half naked, we’re getting a little panicky.So I’m being super boring, and eating salads and working out and pretending it’s all to make myself feel better, and that it’s for my health, instead of just being honest with myself, and admitting that it’s totally just for my ego. Don’t get me wrong, I like being active, and I love vegetables, it’s just that this whole bikini season is getting a bit on my nerves this year. I mean, I have a nice body, and it does remarkable things, like let me stand up for 16 hours a day without complaining too heavily, and let’s me go for long bike rides, and play tennis and hike up mountains. Maybe I’ve got it all right. And as I was thinking this, I also thought about that fabulous line from Sofia Loren. The one she said after she, one of the most beautiful women to ever live, was trashed apart in magazines for having cellulite. And her response, which she was shocked to have to give, was “Everything you see, I owe to spaghetti.” So today, let’s eat spaghetti, and not feel guilty. Let’s just enjoy it for what it is. This one is especially good I think, it’s filled with roasted tomatoes and smoked mackeral and loads of fresh basil. It’s the sort of thing that feels like the perfect Spring dinner, it’s hearty but also fresh and so packed with flavour I didn’t find myself eating quite as much as normal. Small miracles, curtesy of Sofia Loren.

spaghetti-1

Spaghetti with Roasted Tomatoes and Smoked Mackerel

1lb Cherry Tomatoes 150g of Smoked Mackerel, flaked ¼ cup Olive Oil 3 Sprigs of Thyme 3 cloves of Garlic, minced. ½ Onion, sliced 1 bunch of Basil, thinly sliced 2 cups Baby Arugula 1 lb Spaghetti Parm for on top. Salt and Pepper

Preheat the oven to 400F Cut the cherry tomatoes in half and toss them with them with half of the olive oil, salt, pepper and thyme. Lay them on a parchment paper lined baking sheet and bake until they get slightly browned and the juices run. In a large saucepan over medium heat warm up the rest of the olive oil. Add the onion and cook it slowly until they’re soft. Add the garlic and cook for another minute until just fragrant. Add the tomatoes and the mackerel and bring up to a high heat. Cook for 1 minute then remove from heat. Bring a large pot full of salted water to a boil. Cook the pasta to the package instructions. Toss with the tomato sauce and shredded basil. Top with parm and serve!

Roibbos Tea Iced Latte with Almond Milk and Cinnamon

roibos-2.jpg

Do you ever just fall so in love with a company? You know, when you go into a shop and just love everything in it so much you wish you owned the place? And then you meet the owner and they are so lovely and you just are so thrilled to have found them?There are only a handful of places like this for me. This great little shop on Main St., the izakaya down the street from me, the sadly closed Little Nest. The kind of places that immediately just feel perfect. Well, I’ve got a new one for the list, and I have to talk about it because I’m so royally obsessed. A friend of mine posted something about this nut milk company on facebook, and on a whim I ordered some. And then something amazing happened, this lovely woman who makes almond milk, and hazelnut milk, and hazelnut-cocoa milk, delivered it, in a mason jar, to my door on her bicycle. Seriously. Is that not the cutest thing you’ve ever heard of? And, like you would imagine a bicycle riding nut milk making woman to be, she is this bubbly, bright sunshine-y person. Not only is she lovely, but her milks are amazing. They are made from organic nuts (from California except the hazelnuts which she picks herself about an hour outside of Vancouver), and are just wildly more flavourful than the chemical laden stuff at the grocery store. As, despite my greatest attempts to ignore it, my body doesn’t really like dairy, this is pretty wonderful for me. You can probably tell I’m excited. So I’ve been trying out new ways to play around with her products, and what I keep finding is just how brilliant almond milk is with roibos tea. It’s the perfect match for me, hot or cold. This is just a simple recipe, so simple I almost didn’t post it, but it’s too good I had too. Also, I had to talk about how great Nuez milks are, because I’m a little obsessed. Roibos Almost Milk Latte with Cinnamon and Honey Per Drink 1 tsp Roibos Tea 1 tsp Honey ½ cup Almond Milk 1 Cinnamon Stick (or a pinch of ground cinnamon)* Ice *if you are doubling (or tripling!) the recipe you do not need to add more cinnamon. Boil cup of water. Put the tea into a tea strainer and put into a teapot. Add the cinnamon stick and pour the water on top. Let this steep for at least 5 minutes if not longer. Pour the tea into a large cup. Add the honey and stir until it is combined. Add in a few ice cubes and stir until the tea is cooled completely. Add the almond milk. Drink!

roibos-9

Hot Cross Biscuits

tumblr_inline_n44y1hq2Ff1qfrmur.jpg

Apparently my Grammy made much more than just biscuits and pies and “Frenched” green beans. She also only served broccoli with hollandaise, always made her own bread and tended a beautiful garden that yielded an enormous bounty of fresh veggies. In the words of my mom, her adoring daughter “  My Mom grew up in poverty - emotional and financial - and her childhood home was chaotic.  No-one cooked or cleaned and there was never enough food.  So her home had to be perfect.  She was remarkable.”

Hot Cross Biscuits

She was remarkable. And while she may have made a slew of other delicious foods, I will always think of her biscuits (“cloud biscuits” because they are heavenly and light). They were magnificent.

These are just a slight variation, I use butter instead of shortening, because I suspect she might have too, if it wasn’t for budgeting. And here of course, I’ve added some spices and currants to the mix, and topped them with an icing cross to be festive. But they are none the less my Grammy’s cloud biscuits, and they are remarkable, much like their creator.

[divider type="thin"]

Hot Cross Biscuit

  • 2 cups AP Flour
  • ¼ cup Sugar
  • 1 ½ tsp Cinnamon
  • ½ tsp Ground Ginger
  • ½ tsp Ground Nutmeg
  • 4 tsp Baking Powder
  • ½ cup Butter, cut into small cubes.
  • ½ cup Currants
  • 1 tsp Salt
  • 2/3 cup Buttermilk
  • 1 Egg
  • 1 Yolk
  • 1 cup Icing Sugar
  • 1 tsp Vanilla Extract

In a large mixing bowl mix together all of the dry ingredients.

Toss in the butter and using your hands (or a pastry cutter) and break the butter up into pea-sized pieces.

Add the egg to the buttermilk and whisk it until combined.

Add the liquids into the flour mixture and stir until it just starts to come together.

Add in the currants and press the dough out, and then fold it in half. Repeat this 5-10 more times until the dough has lots of layers and has formed a cohesive dough, but remains very soft- as soon as you start to feel the dough resisting stop.

On a lightly floured surface press the dough down so that it is ¾ inch thick. Cut the dough into circles- do not twist when you do this! Go straight up and down!

Put the circles on a parchment lined tray and put them in your freezer for 20 minutes.

Preheat the oven to 400F.

Mix the yolks with 1 tbsp of water. Brush the egg wash on all of the biscuits and bake for 20 minutes, or until the outsides are nicely browned. Allow to cool completely.

Meanwhile mix together the icing sugar and vanilla extract with 1 tsp of water. Put in a piping bag (or a Ziploc with a hole cut in it) and pipe on the crosses.

Eat immediately!

Sunday Salads- Roasted Butternut Squash with Pomegranate and Za'atar

tumblr_inline_n3mtj2AZGf1qfrmur.jpg

The Italian in me just wants to make the simplest food. It doesn’t want to be fussy. It doesn’t want spend hours cutting things just so or mixing 25 ingredients into a salad dressing. My Italian side also pretty much just wants to make gnocchi and tomato sauce all day, which, though delicious, would not make for the most interesting blog. Fortunately, I have fallen deeply in love with Middle Eastern food. The rich flavors, the complex spice mixes, the vegetable forward way of eating.  The more I cook like this, the more I realize that the Italian way of eating simple food, not doing too much to it, that totally unfussy way of cooking seems to fit right in.

It’s actually been kind of exciting to me, to try new spices and spice blends and treat them to the ways I’ve always cooked food. This salad is a great example. I love squash, and roasting it up with red onions and tossing it with some greens and nuts in a simple vinaigrette is something that I would always do. But in this Middle Eastern update, I toss the onions in pomegranate molasses before roasting them, and add fresh pomegranate on top. I toss everything together with some salt and lemon and za’atar, an amazing spice blend of oregano, cumin and sesame seeds, that you can buy already blended and ready to go. Then I put a bowl of garlicky yoghurt on the side to dip the salad in.

The result is something so much more complex and rich than I would have ever made before, but is still incredibly simple and easy to do.

Small miracles friends. They do happen.

Squash and Pomegranate Salad with Za’atar

  • 2 small Kombucha or Butternut Squash
  • ¼ Pomegranate
  • 1 Red Onion
  • 2 tbsp Pomegranate Molasses*
  • ½ Lemon
  • 1 tbsp Za’atar
  • Olive Oil
  • Salt and Pepper

For Garlicky Yoghurt:

  • ¾ cup Greek Yoghurt
  • 2 large clove Garlic
  • 1 tsp Salt
  • 1 tsp Lemon Juice

Preheat your oven to 425F

Peel the squash- butternut squash can be peeled with a peeler, the kombucha squash will need to be done with a knife and some patience. Be careful!

Cut the squash in half and scoop out the seeds. Wash the seeds and toss them with some salt and a good glug of olive oil. Put them on a tray and bake for about 20 mintues, stirring every 5 mintues.

Cut the squash into ½ inch wedges and lay them out on a baking tray. Toss with a good glug of olive oil and a healthy pinch of salt. Bake for about 45 minutes, or until the squash is fully cooked.

Peel the red onion and cut it in half. Cut into thin strips and toss with salt and the pomegranate molasses. Put them on a baking tray and roast them for about 20 minutes, or until they are soft and a little bit caramelized.

Phew! No more roasting!

Meanwhile make the garlicky yoghurt:

Smash up the garlic as small as you possible can. Mix it with the yoghurt, salt and lemon juice.

When the squash are still warm sqeeze the lemon juice on top and toss to mix. Check your seasoning and add some salt if you need.

Put the squash on a platter. Top with the onions and roasted squash seeds, and break apart the pomegranate and sprinkle the seeds on top.

image

Poached Eggs with Seared Trout and Minty Pesto

tumblr_inline_n2szi49T9a1qfrmur.jpg

My Mom grew up with what she calls “Depression Era” food. The sort of get-as-much-fat-in-you-while-you-can-because-you-don’t-know-when-food-will-be-around-next. The sort of food inspired by the hardships her parents faced when they were young. She had never had a green bean not cooked in cream sauce until her twenties. It wasn’t food that was based around quality ingredients, or fresh ingredients, or local produce, except incidentally. In fact I’ve only really heard her talk about a handful of things she ate as a kid. Mostly we talk about her moms “cloud” biscuits, which are legendary in my family. They are outrageously good. As are Grammy’s gingerbread cookies and her pies. The other food-things that my mom talks about from when she was wee, is corn and trout, which are things her dad made.

For corn, my Grampy would have a pot of water boiling on the stove, and then, and only then, would he go outside and cut the corn, shuck it, and bring it inside to boil. The pot had to be boiling. It’s the only way to eat corn.

The other thing my Grampy did was go trout fishing. He’d wake up at the crack of dawn and escape the kids and watch the sunrise. And then he’d fry up trout for breakfast for the family. My mom starts smiling when she talks about those trout.

I’ve been thinking an awful lot about Grampy lately. I cleaned out my desk the other day and found a slew of cards I’ve written him and never sent. Which is ridiculous. I’ve got stamps, I’ve got envelopes. I’ve got cute little cards. They have thoughtful notes written out. Why haven’t I sent them? They do no good here.

The other thing I found was all these letters that he’s sent me. His is so witty, and smart, and funny and charming. There is so much of his personality in those letters, a personality I don’t know very well because we live so far apart.

So the other day I was thinking about him, still kicking it at 94, when I walked by my local fishmonger and there were the most beautiful little trout in the window. And I knew I had to get some for breakfast.

I’m sure this is not how my Grampy made trout. I can’t imagine him making a pesto or poaching an egg, although it’s possible that those are two skills he has that I don’t know about. But it’s a very me breakfast, poached eggs and beans and pesto, with a bit of him thrown in, in the form of little river fish.

And it was wonderful.

Poached Eggs with Seared Trout and Minto Pesto and Green Beans

Serves 2

  • 1/2lb Green Beans, cleaned with the woody ends picked off
  • 2 small Trout, or one larger one. Gutted and filleted.
  • 2 good quality Free Range Eggs
  • 1 small Handful of Mint
  • 1 large Handful of Parsley
  • 1 small clove of Garlic, peeled and coarsely chopped.
  • 1 Lemon
  • 1/3 cup Olive Oil
  • Salt and Pepper

In a food processor blitz together the parlsey, mint, garlic and ¼ cup of the olive oil. Zest half of the lemon in and add in a healthy pinch of salt. Pulse a couple times. Check for seasoning. Put aside.

Fill a medium pot with water and bring to a boil. Add a pinch of salt.

Meanwhile bring a small frying full of water to a boil. Add the beans and cook for 2 minutes. Strain and set aside.

Rinse out the frying pan and put it back on the stove over medium heat.

Let it warm up and then add the remaining olive oil.

Season the trout liberally with salt.

When the pan is quite hot (but not smoking) put the fish fillets in skin side down. Immediately shake the pan a bit to move the fish around. That will make sure they don’t stick.

Cook the trout on the skin side until it’s about ½ way cooked. Flip them over, and cook for 30 more seconds.

Put the fish on a plate.

Once you’ve flipped the fish crack your eggs into your boiling water. Turn the water down to a simmer. And cook for about 3 mintues for nice runny eggs.

Put them on top of the fish with the beans and spoon the sauce on top. Serve Immediately.

Tuesday Tutorials- The Mighty Macaron!

tumblr_inline_n2nl6keU3L1qfrmur.jpg

Oh le macaron. Those perfect jewel toned cookies that take you entirely out of where you are standing and promptly in front of Pierre Herme in Paris.

They are a glorious little things aren’t they?

Except when they’re not. And sometimes they really, really aren’t.

Sometimes they are dry little meringues with a sad dollop of filling that makes the whole thing downright miserable.

Macarons done right are magnificent. Done poorly, are no good at all.

So today, I’m going to show you how to make macarons, the proper way.

I have made literally every mistake I think it is possible to make with a macaron. I have sat on the floor and wept not understanding what it is I have done wrong, and that is sadly, not at all an understatement. I’m not being dramatic. I have wept.

But here’s the good news. I have made every one of those mistakes so that you don’t have to. I can tell you every trick I’ve learnt so that you can do them perfectly.

Let’s get started shall we?

Macarons

Recipe from Pierre Herme

  • 300g Sifted Ground Almonds
  • 200g Icing Sugar
  • 110g Egg whites
  • 300g Sugar
  • 110g Egg Whites

Filling of your choice (I’m a sucker for ganache- try this recipe!)

Sift the ground almonds and icing sugar into a large bowl.

Add the 110g of egg whites but do not mix them.

Put the remaining egg whites into the bowl of a standing mixer fitted with the whisk attachment.

In a small pot mix the sugar with a small amount of cold water so that the sugar has the texture of wet sand. Put a lid on it (if you don’t have a lid an upside down frying pan works well!) and put it on a burner over medium low heat.

When the mixture is boiling rapidly and all the sugar has dissolved you can remove the lid. You’re doing this so that the sugar doesn’t crystallize. By keeping the lid on, which encourages condesation in the pot, the sugar won’t crystallize against the edges. It’s a bit of a cheaters trick, and it works brilliantsly.

Now put your candy thermometer into the pot and turn the temperature up to medium high.

Cook the sugar mixture to 118C.

When the sugar get’s to 115C turn the mixer on medium and whisk the egg whites.

When the sugar gets to 118F carefully remove it from the heat and slowly pour it into the mixer with the motor running. You want to make sure you’re not pouring the sugar onto the whisk which it turn is splashing it on the side of the bowl. You’ll lose too much sugar, instead drip it down the side of the bowl in a thin stream.

Once the sugar mixture is all in, keep the mixer running until it is very thick, but still slightly warm when you touch the side of the bowl. You want it to be just about body temperature.

Now you can fold the two mixtures together. This is the trickiest part. This isn’t like normal folding egg whites in where you want to deflate it as little as possible. Instead you’ll actually whip them together with a spatula. The trick is deflating it just enough.

You want the batter to still be thick, but when you life your spatula up and let the dough fall back down, you’ll want it to melt back into the batter, although not too quickly.

That sounds tricky but here’s the nice thing; as soon as you start piping your macaron shells you’ll be able to tell if you did it right or not. If you didn’t, you can just scrape up the batter, mix it up a bit more and then pip it again. No problem. Don’t stress okay?

Good.

Now that you’ve made your batter it’s time to pipe. Fit your piping bag with a round tip about 5mm wide.

Line 4 baking trays with 4 silpats. If you don’t have silpats you can use parchment paper, but the parchment is likely to bend a bit when you’re baking and they won’t be quite as perfectly round.

Pipe your macaron shells to be about 1.5 inches and space them about an inch apart.

Now let them sit. You want to wait roughly 30 minutes, or until the soft shiny-ness of the macarons has dulled slightly and turned a bit more opaque. This hardens the shell and ensures that the shell won’t crack.

Preheat your oven to 350F.

Bake your shells one tray at a time, for about 4 minutes, then turn them, then another 3 minutes in a convection oven. In a standard oven it would be more like 5 minutes turn 4 minutes.

When you think they’re done gently wiggle the top of one with your finger: it should still wiggle but also be a little bit firm. Take them out and let them cool completely.

Cook the other trays the same way.

When they are fully cooled use an offset spatula to pick them up off the silpats, they shouldn’t stick too much.

Match them up in rows of two with ones that they are closest to in size (uless your piping skills are totally spot on there will be a few differences in size!)

Now gently push in the base of each shell- this will make more room for the filling.

Pipe in your filling, and turn the tops over and gently sandwich them together.

Le macarons! C’est Finis!