Shakshuka

image

When I was about eight, and my sister was twelve, she became a vegetarian. And because I wanted to be just like my older sister, I followed suit. She stopped after a couple years, but to make sure my family didn’t think I was just copying her I ended up staying vegetarian for nine years. I copied a lot of what my sister was doing. She was a trend setter.

I now eat meat, and I love it I do, but I’m pretty sure I could be vegetarian 75% of the time. I love veggie dishes. I’m all about them really, but I live with a man who expects meat with every meal.

This is a totally novel idea to me, and if we’re being honest, it’s a pretty novel idea for mankind.

So I’m always making vegetarian dishes and hoping he doesn’t notice. This pretty much never works, but I try friends. For purposes of money and health, I try.

But then something amazing happened. I made this breakfast and Jordan said it was the best breakfast he had ever had. And this breakfast was essentially a thick tomato sauce, filled with peppers and spiked with cumin and coriander, that you make little hole in and cracked eggs into. It’s rich without being heavy and it’s balances the salty, spicy, tart, sweet thing perfectly. On top of that it’s super healthy, takes half an hour to make from start to finish, and it also only takes one frying pan to make, and as someone without a dishwasher, let me tell you, that is wildly important.
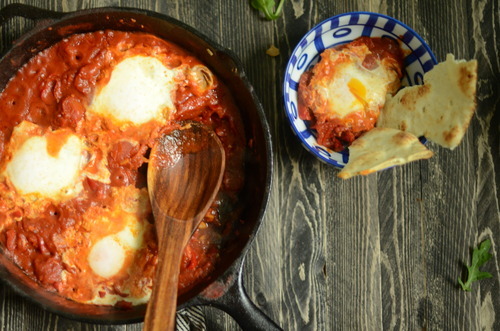
image

Shakshuka

(Not surprisingly this recipe is adapted from Jerusalem, the amazing book by Sami Tamimi and Yotam Ottolenghi. This book is amazing, truly, I can’t recommend it enough.)

2 Red Sweet Peppers, thinly sliced

1 can Plum Tomatoes or Cherry Tomatoes (look for brands that don’t add citric acid)

1 Onion, thinly sliced

2 cloves Garlic, minced

1 1/2 tsp Ground Cumin

1 1/2 tsp Ground Coriander

1 tsp Ground Pepper flakes, or in a pinch some Siracha will do

4 Eggs (the best free-range ones you can find!)

Salt and Pepper

3 tbsp Olive Oil

Toast to serve with.

In a large frying pan (cast iron if you have it) warm the olive oil over medium-low heat.

Add in the peppers and onions and cook until the peppers are very soft and the onions are just starting to brown around the edges, about 7-10 minutes

Add in the garlic, stir for about a minute, then add in the spices.

Stir them in until they are fragrant but not burning at all.

Add in the tomatoes and mix.

Bring heat up to medium-high and let simmer for 10 minutes, stirring regularly, until the sauce has thickened.

Bring heat down to medium, and make 4 divets in the sauce.

Crack the eggs into the holes, and cover with a lid for 3 minutes.

While this is happening you can warm up some naan or toast.

When the yolks are still soft but the whites are firm remove the shakshuka from the heat and serve immediately, with thick toast to sop up all the sauces.

Tomato Tart Tatin

Here’s the thing about tomatoes. They might be my favourite veggie (I know I know, they’re a fruit, but you know what I mean.). They’re sweet, they’re savoury, they’re juicy.

Here’s the other thing about tomatoes. If you put them in the fridge, they suck. They get grainy, they get flavourless, they loose everything special about them.

Here’s the thing about my local green grocer: they put their tomatoes in the fridge at night.

So when I got all excited about fresh tomatoes the other day and they were all warm from sitting in the sun I grabbed myself a big bag full. And then I got home to find grainy sad tomatoes, far from their peak.

image

Here’s the thing about sad grainy tomatoes: they’re still pretty good when you cook them. Usually this means tomato sauce, but the other day it meant this fabulous tart tatin that was on Design*Sponge a couple weeks ago. This is a damn good tart, it’s very savoury (a lot of veggie tatins tend to be a bit sweet for my taste) the pastry is flaky and light, but just buttery enough to have enough flavour to hold it’s own with the tomatoes, and the onions and cheese help bring a depth to it that rounds the whole thing out.

I didn’t use the crust from the original recipe, because I tatins should always be made with puff in my books, and after last Tuesday’s Tutorial on quick puff we’re all pros right? Right.

image

Tomato Tart Tatin

(Adapted from Design*Sponge)

Dough:

1 cup Cold Butter, unsalted, cut into cubes

2 cups AP Flour

1/2 tsp Salt

1/2-3/4 cup Ice Water

For a full tutorial on making this dough with lots of pictures, click here!

On a clean surface toss the butter cubes with the flour and salt.

With a rolling pin roll out the butter so that all of it forms into long thin strips.

Add the water, a couple tablespoons at a time and fold the dough, push it out, add more water, and fold the dough again.

Continue this until it has come together as a cohesive dough.

Wrap with plastic wrap and put in the fridge for at least an hour, or up to two days.

Tart Tatin:

1 recipe of quick puff pastry dough (aboce)

10 Roma Tomatoes

1/4 cup Grated Parmesan Cheese

1 Onion, thinly sliced

2 tbsp Olive Oil

1 tbsp Fresh Thyme Leaves

Preheat oven to 400F

In a medium pot over medium heat warm up 1 tbsp of the olive oil.

Add in the onion and cook, stirring often, for about 10 minutes, until they are soft and just starting to brown on the edges.

Grease a pie pan with the remaining olive oil. Cut a circular piece of parchment and line the bottom of the pan.

Slice the tomatoes in half and put them skin side down in the pan. They will shrink up as they cook so overlap them a bit so that when they are cooked they will still cover the bottom of the pan.

Top them with salt and pepper, the onions, parm and thyme.

On a lightly floured surface roll our the dough into a circle just larger than pie pan.

Cut the edges to clean them up and put it into the pan.

Bake for about 40 minutes, or until the pastry has turned a nice brown and the juices bubbling up the sides are browned as well.

Allow to cool for about 10 minutes before flipping it onto a plate.

Serve while warm or at room temperature.  

image

Sunday Salads-Quinoa Salad with Tomatoes, Black Beans and Feta, with a Lime Cilantro Vinaigrette

The internet has a funny way of throwing things at you. You know, you see something once and think “hmm, that doesn’t look bad” and then you see it another 40 times and at that point you just have to make it because you’ve seen it so many times and you need to get up on the trend? Even if at this point it’s far from trendy?

Well, the quinoa burrito bowl has been doing the rounds on social media lately. First I saw it on tastespotting, and then I noticed it on twitter, and by the 54th time I saw it on Pinterest I had to make it. It’s a simple thing really, quinoa, refried beans, salsa, and a little cheese on top. It took less than half an hour to make and was a very tasty simple dinner, except that Jordan all but refused to eat it.

See, Jordan likes healthy food, he does. He even likes quinoa, but he doesn’t like pretending unhealthy foods are good for you. It’s actually something we both have in common- you know, the “sugar-free-gluten-free-soya-free-vegan-cupcakes-that-totally-taste-like-they-have-nothing-delicious-in-them-and-are-trying-so-hard-to-be-something-they-aren’t” kind of things.

I tried to explain that I was simply substituting one ancient grain common in Central America for another ancient grain common in South America but he was having none of it. But men are fickle creatures.

So the next day I added all the ingredients together, made a salad with it and he ate seconds.

Like I said.

Fickle.

Turns out this is even better, because you can keep eating it out of the big bowl in the fridge standing up and not feel guilty about it.

This is that salad, I put a poached egg on top, because I am nearly always wanted to put a poached on top of salads but that is optional.

Quinoa Salad with Black Beans, Tomatoes, and Lime-Cilantro Vinaigrette and Feta

2 cups Cooked Quinoa

1/2 cup Chopped Cherry Tomatoes

1 small can Black Beans, rinsed carefully.

1/4 cup Cilantro, chopped

1 bunch Green Onions, thinly sliced

1/2 cup Crumbled Feta

1 Lime, zested and juiced

1/4 cup Olive Oil

1 1/2 tsp Smoked Paprika

Salt and Pepper

In medium sized bowl mix the zest, juice, paprika and oil. Add salt and pepper to taste.

In the same bowl add in all the other ingredients and mix.

Poach an egg if that’s your style. It might be. It’s my style.  

Tuesday Tutorials- No Knead Margherita Pizza

I live in what was traditionally Little Italy, an area called Commercial Drive. There are two big pizza places, a divorced couple who hate each other and own two competing, but equally horrible overpriced restaurants across the street from each other. There were a couple cheap slice joints, you those weird ones that put sesame seeds on the crust? Those kinds of cheap slice joints.

Then a couple years ago there was a bit of an outcry that there was no good proper pizza in Vancouver. And then two years ago was the year pizza came to the city. In droves. There is pizza everywhere.

Here’s the thing of it. I love pizza. Good proper Neopolitan pizza is hard to beat. And I eat it all the time.

The best pizza joint in the city is now 3 blocks away from my house. And a totally reasonably good place is 1 block from my house. And it has this lunch special, and I am there all the time. All the time!

And while pizza isn’t expensive, I have decided that this year is the year to not go out for cheapy lunches and to make dinner at home more.

So I’m going to start making pizza at home. Partly to save money, yes, I’ll admit to that, but largely because I can make proper pizza at home. And it’s unbelievably easy.

Heres the thing of it, you don’t knead the dough. And you don’t cook the sauce.

Are you ready to make wonderful pizza at home without kneading the dough or cooking the sauce?

I thought so.

No Knead Margherita Pizza

Adapted from the Sullivan St. Bakery

Dough

31/2 cups AP Flour

1tsp Dry Active Yeast

2tsp Kosher Salt

1 1/2 cups lukewarm Water

Sauce

1cup Strained Tomatoes

A good glug of Olive Oil

Sea Salt

4 balls of Fresh Mozzarella

A Handful of Fresh Basil

1/4 cup Grated Parmesan or Grana Padano

With a wooden spoon mix all the dough ingredients in a large bowl. When it’s all combined cover it with plastic wrap and leave it. Forget about it for 18 hours! This is sort of a loose measure of time, I make mine before I go to bed and it works out beautiful when I make dinner, but I have also been impatient and used the dough and made pizza for lunch and it worked really well too. I’d say 13-20 hours is the range really.

When your ready the dough will make 2 big pizzas.

Preheat your oven as hot as it will go. Mine is 500F. If you have a pizza stone, use it. If not, just take an old baking sheet and put that in your oven and let it get toasty hot. Once the oven is hot enough let it sit at that temperature for at least 15 minutes before you start working on the dough.

The dough will be very soft and sticky so use lots of flour. The first rule of dough is not to roll it. Carefully with your fingers streth the dough out, I find it easiest to hold the dough in the air put your clenched fists under it and gently pull them apart. The dough will get thin, then put it on a well floured surface and use your fingertips to stretch out the edges.

Generously flour a rimless baking sheet or the bottom of a rimmed baking sheet.

Put the dough on top of that.

Use half the strained tomatoes and spread over the dough leaving a half inch of space around the edges for the crust.

Drizzle the olive oil on top and sprinkle with salt (you could mix all the these things ahead of time, but then you’d have to clean another bowl, which is something I avoid like the plague.)

Cut the cheese thinly and put 2 balls worth on each pizza.

Take out your pizza stone or baking sheet. With quick jerking motions slide the pizza off your cold tray and onto the hot one. Immediately put it in the oven.

I have what might possibly be the worst oven of all time. If your oven cooks as unevenly as mine you’ll have to rotate your halfway through cooking, although if you can keep the oven shut that’s the best thing.

After 2 minutes of baking turn the broiler on for 2 minutes. This should help the dough get a bit charred. After 4 minutes your pizza should be done.

Get it out of the oven, sprinkle with parm and torn basil and eat while it is still piping hot!