Cinnamon Roll Biscuits

image

People always ask me what my favourite thing is to bake. I tell them I’m a baker and it’s the first question. And here’s the thing of it; I never know what to say.

There are things that I don’t love baking- macarons for instance, which are delicious and wonderful, are also the bane of my existance. Puff pastry, with it’s tedious rolling and folding would fall into that category, but favourites? They’re harder to come by.

But recently I’ve decided. They’re something friends always ask me to make, and then continue to talk about long after the last one has been scarfed up, and they’re something I genuinely really enjoy making.

Biscuits.

Guys, I’m willing to put it down into the internet, a place where things are never deleted. I make great biscuits, and I love making them.

The simple act of cutting in the butter, folding in the buttermilk, pressing out the dough with my finger tips. They are my favourite. I love them.

Which is a good thing, because man oh man, have I made a lot of biscuits lately. I’d say about 300 last week alone.

Oy.

See I work for a Southern restaurant which opened up last week as a pop up fried chicken shack. And what is fried chicken without biscuits? Not much apparently, because those things were flying out of the kitchen. It was all biscuits all the time.

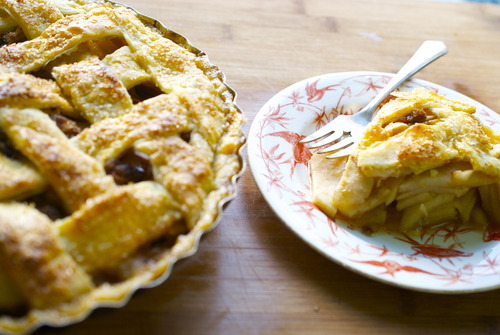
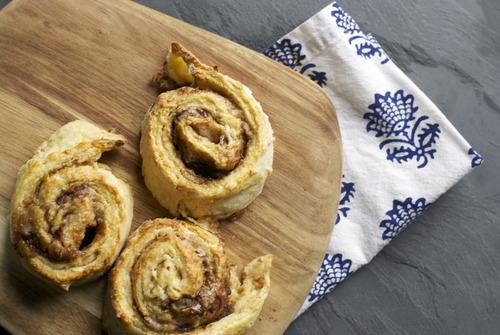
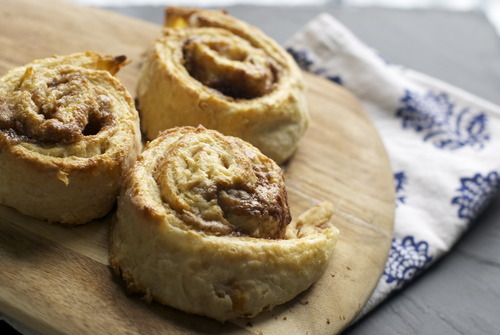
So with the scrappy bits that were left over and a bit to tough to serve, I rolled them out , sprinkled them with cinnamon and brown sugar and rolled them up. They’re like the cookies my mom used to make with left over pie dough, except much, much, bigger and fluffier.

And seriously, those things were delicious. Like, proper, all kinds of wonderful, I will sell these one day when I open a bakery, delicious.

They were one part biscuit, one part cinnamon bun, and all parts fantastic. So there you go.

Biscuits, they are my favourite, whether for dinner, or for breakfast, or for shoving in your face when they’re covered in cinnamon and sugar and still hot from the oven.

image

Cinnamon Roll Biscuits

Adapted from the Tartine Bakery Cookbook

3 3/4 cup AP Flour

1 tbsp Baking Powder

3/4 tsp Baking Soda

1 tsp Salt

1/4 cup Sugar

1 1/2 cups Buttermilk

1 cup Butter, very cold, cut into small cubes

Filling:

1 cup Brown Sugar

2 tbsp Cinnamon

Egg Wash:

1 egg yolk

1tbsp Cream/milk

Preheat your oven to 375F

In a large bowl mix together the flour, baking soda, baking powder, salt, and white sugar.

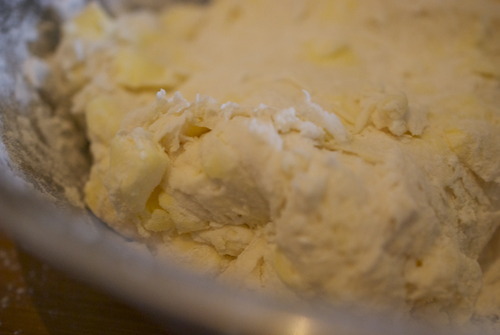
Put in the cold butter and with your hands break the butter into pieces. You want the butter to be in big pieces and very cold- it’s this cold big butter that goes into the hot oven and causes steam which makes the biscuits rise. The pieces of butter should be somewhere between a pea and a fava bean.

Slowly add in the buttermilk and fold it in gently, adding more if you need it, to make the dough just come together. Make sure your scooping all the dry bits from the bottom of the bowl.

On a well floured surface fold the dough, flatten it out, and fold it again, about 5 times until the dough has come together nicely but isn’t getting firm.

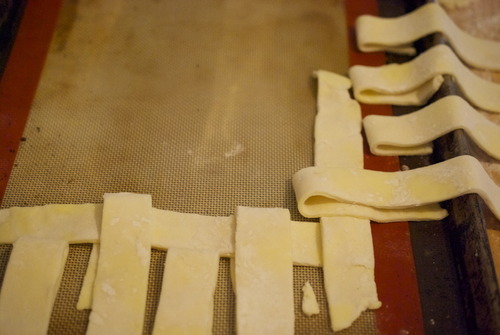
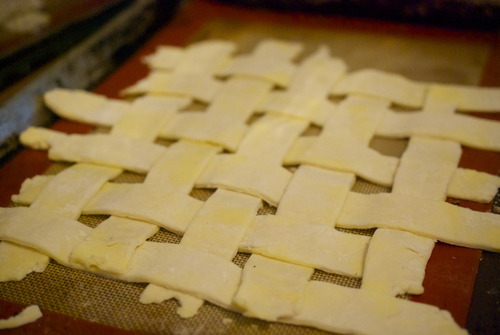
With a rolling pin roll out the dough to about 3/4 inch thick, being liberal with the flour so it doesn’t stick.

Sprinkle the brown sugar and cinnamon on top and roll up the dough into a log.

Cut the dough into 2 inch pieces.

Put on a baking tray and refridgerate for 20 minutes.

In a small bowl mix together the egg yolk and the milk/cream.

With a pastry brush, brush the tops of the scones with the egg wash and put into the oven right away.

Bake for about 20 minutes or until the tops are starting to brown and your whole house smells incredible.

Let cool for at least 10 minutes before digging in!

Stocking Stuffer- Last Minute Edition- Chai Mix

image

Merry Almost Christmas!

Oh I love Christmas. I really do. The lights, the family, the warmth, the present buying. It’s all wonderful thing.

Christmas is also hectic. It’s running around, it’s trying to see everyone, and in my industry it’s Christmas baking for the masses and making cakes for Christmas parties, and this year there was also a huge winter wedding that required two wedding cakes just a couple days ago. Which has made this holiday season a little more crazy even than the usual.

So this is a bit last minute, which is too bad, not only because it’s acknowledging my total break in organization, but it’s also dissapointing because this is one of my favourite in this line of Stocking Stuffers that my amazing friend Jen and I did together.

I am not a coffee drinker. It kills my stomach and gives me terrible acid reflex, and it’s just generally a terrible idea for me. But when I was waking up at 4am to bake bread a few years ago I needed something that would give me a kick and wake me up that was just a bit more gentle on my belly, and that’s when I became obsessed with Chai.

It’s a potent mix of flavours, the cardamon meddling with the cinnamon , balancing off the dark black tea, it’s a truly wonderful thing. Traditionally it’s served very strong and steeped in milk, but I will happily drink it black, and even, often, with soy instead of cows milk- because my sensitive stomach doesn’t like dairy much either. It’s the perfect thing first thing in the morning for someone like me.

Once again Jen Cook has blown the packaging out of the water, these little bags are so charming and so easy I’m just blown away, as I have been every week as we’ve been making these stocking stuffers. So please, even if you’ve made all your Christmas presents already, make this as a gift to yourself, to keep you warm on cold mornings.

image

Chai Tea Mix

4 5” Cinnamon Sticks

40 Green Cardamon Pods

3tbsp Black Peppercorns

3tbsp Whole Cloves

1 cup Ceylon Tea

In a small pan over low-medium heat toast the spices seperately, until they are fragrant but not smoking. 

Pulse them in a spice grinder until they are just broken up but not ground finely. 

In a bowl mix the spices with the black tea and then evenly put them into four bags. 

Tape the bags shut and put them into the boxes and give them out at will- or keep all the chai for yourself!

image

Tuesday Tutorials- Gingerbread Caramels

People are intimidated by candy. Which seems odd to me, I mean, everybody I knows has a favourite candy, everyone I know has old memories about candy, and yet people are terrified to make it themselves.

Candy is all about sugar. Sugar does amazing things, keep it in a pan and it turns to caramel. Twist it at the right moment and it becomes toffee. It can be shatteringly crisp, soft and pliable, or melting and sandy, it just depends on how you treat it.

Caramels are one of the easiest pieces of candy to make, and I’m not just saying that because they’re my favourite. I promise.

Here are things to remember:

  • Sugar can crystalize. It can do this in several ways, and once it starts your whole caramel is toast. Sugar wants to crystalize, if there are bits of crystalized sugar on the edges it will spread, and if you can start it crystalizing by stirring it.

  • Preventing crystalization is really very easy. Most people tell you take a damp pastry brush and brush the sides of the pan to make sure that all of the sugar dissolves. This is silly. You can just put a lid on it. (if you like it then you shoulda putta…. sorry. I had too.) The condensation will make sure all the crystals dissolve.

  • Make sure you have everything ready when you start. Once the sugar starts to caramelize it will happen quickly, to be on top of it, be prepared. In a restaurant we call this “mise en place”

These are the best caramels I know how to make, and they are rivalled only by the ones I ate in Paris that were made with Normandy cultured butter and full of chopped hazelnuts. These ones are very buttery, and have a very strong caramel flavour without ever being bitter. They are all kinds of wonderful. You can make this recipe without the seasonal adjustment, they are fantastic as classic salted caramels, but it is December after all, so these are Gingerbread Caramels, and they are my favourite.

3 1/2 cups Sugar

1/3 cup Corn Syrup

1/4 cup Water

400mL Heavy Cream

2 3/4 cup Unsalted Butter

1tbsp Cinnamon

1tsp Cloves

1tsp Ground Ginger

1/2 tsp Nutmeg

1/4 tsp Ground Fennelseed

1tbsp Fancy Molasses

1tbsp Salt

*if you don’t want to make gingerbread molasses simply don’t add in the cinnamon, cloves, ginger, nutmeg, and fennelseeds, and instead add 2 tablespoons of salt.

In a large pot with deep sides and a secure lid mix together the sugar, corn syrup and water. Put a lid on it at put the pot on medium heat. After 4-5 minutes go and check on it. If it is totally clear and bubbling and there is absolutely no trace of sugar crystals take the lid off. If there are give it a quick stir and put the lid back on. Keep doing this- although don’t stir more then once every 3 minutes) until it is completely clear and there is no trace of a crystal anywhere. Then take off the lid. Once you have given it a last stir put that spatula in the sink. It will have bits of crystalized sugar on it which you don’t want to reintroduce to the mix. SO if your anything like me, you’ll need it out of arms reach or you’ll grab it accidentally.

In a small pot nearby mix the heavy cream with the salt, molasses and all the spices, if using and gently bring to a boil. Once it has come up put a lid on it and keep it on the burner so that it stays warm.

Keep an eye on your sugar. Don’t mix it once you take the lid off it, instead give it a bit of a shake every once in a while. Keep the heat on medium, it will take longer to caramelize but you will get a nicer more even flavour.

After a few minutes the sugar will start to turn brown, slowly. Give it a shake so that it’s not getting darker in one area.

Once the whole thing has come up to a nice deep auburn color turn off the heat and add in the cream.

The cream will hiss and steam and bubble. It will be alarming, but don’t be alarmed. Take a whisk and stir it being careful not to burn yourself from the steam.

Now add in the butter, piece by piece while whisking it like hell. You can use an emersion blender for this if you’d like, many people do, but mine doesn’t work very well so I do it by hand. It’s a bit of a workout.

Now bring the heat back up to medium and start cooking your caramel. You will have to stir it the whole time so use a rubber spatula so that you make sure you get into all the nooks and crannys and slowly, carefully watch the temperature rise with your thermometer.

When it comes up to 254F take it off the heat and immediately pour it into your prepared pan. Do not scrape the bottom of the pot, the temperature will have made the remaining bits harden, but do scrape the sides.

Allow the caramels to cool for at least 6 hours before cutting and wrapping them.

Stocking Stuffer Sundays- Mulled Wine Kits with FREE downloadable labels

Jordan introduced me to mulled wine many years ago. The slow cooking of red wine with spices and congac that makes any amount of snow dissapate instantly has been a favourite of mine for some time now, but my love of it really cemented a few years ago when I was in France.

I was just puttering about feeling a bit lonely, it was near the end of my trip, when I stumbled across the most incredible Christmas market. They had closed down about ten blocks of the Champs Elysee and had lined both sides with little white cottages filled with the most wonderful little treats. Candy makers, nut roasters, cutting board sanders, and doll sewers all had stands filled with gorgeous things to eat and buy, but all of it was made better by the vendors who sold “vin chaud”. Hot wine, or as we call it here Mulled Wine is all kinds of wonderful, it’s the most soothing thing I can think of it tastes exactly like Christmas.

Jordan makes a great mulled wine, so we thought we would make these little packages of all the spices you need and sew them together with these sweet tags and attach them to wine bottles, which makes a lovely stocking stuffer or a slightly more personal hostess gift.

So with this recipe also comes a free download for the labels, which are double sided, because of the wonderful generosity of a very dear and extremely talented friend, one Miss Jen Cook. Jen is the genius behind my entire website and my logo, and shes is just about the most patient person I know to put up with me as a client. And when I casually mentioned this project to her she jumped at the chance to do some labels for me.

So, without further ado, here is the recipe, the methodology and the free printable downloads for Mulled Wine Kits. If you do make it I’d love to hear about it so let me know in the comments!

Mulled Wine Kits

Click here for your FREE downloading label

Per Pouch:

1 Long Cinnamon Stick, broken in half

2 Cloves

1/2 Star Anise

1/2 Vanilla bean

1 Long strip of orange zest

Cheesecloth

Fold a long thin rectangle of cheesecloth in half, making a shorter rectangle.

Place all the ingredients on top.

Fold the Cheesecloth over the spices creating a pocket.

Sew carefully around the spices in a square.

Tie a piece of twine onto the pouch and tie the other end to your label.

Tie around a bottle of wine and c’est finis!

Tuesday Tutorials- Perfect Lattice Top Apple Pie

've been doing a lot of thinking about this little spot in the blogosphere lately. About what makes this little piece of the pie (no pun intended) more special, more worthy of your attention than any other, and the thing that kept coming to mind, is that I am a professional. I have not only gone to school to be a baker but I have worked for countless talented people who have shown me so many tricks along the way. Most people who write on the internet don't have that advantage, and so begins “Tuesday Tutorials” in which I share these tricks of the trade with you, my loyal readers. The idea being that once a week I will write something kind of fundamental, a basic, and show you how I make it, and the way I do that makes it so good.

And to start, pie.

There are few things better than the smell of homemade apple pie. It is so quintessentially North American, so perfectly Fall, so designed for November weather. Apple pie is darn near perfect.

My mother makes a mean apple pie. A mean pie in general really, despite her absolute failings on many a cake, my mom kills pie. Seriously.

This is a recipe for a pie that is both hers and mine, I make mine with more butter than hers, she adopted her recipe from her mother, and growing up in The Depression, shortening was easier to come by than butter, but in these modern times I have no trouble at all with the subsition.

There are two ways of making pie filling though. You can cook the fruit before hand, add in corn starch or flour and thicken up the juices or you can put it all in raw. You get very different results with these methods, and in bakeries you almost always get the cooked before variety. And while I think this method is great for juicy berry pies, when I make an apple pie I put in the fruit raw, then top it all with brown sugar, cinnamon, and flour to thicken it up. It’s how my mom made it, and so it tastes like home to me. And that, good friends, is what apple pie is all about.

The real tutorial here though is how to make a perfect lattice top to your pie, the kind that friends will ooh and ahh over, and you can revel in self satisfaction when you sit it on the counter to cool. A lattice top pie is not something to brush off, it takes some skill, and it demands it when you put it on the counter. Unless of course, you follow this tip, which just makes it so easy.

The thing to do is freeze it. Make the lattice on a baking sheet and freeze it, it will only take about half an hour, just enough time to cut up all the apples and make yourself a cup of tea. And then slowly put the top of the pie onto the pie crust, you get a perfect crust every time, and you save the stress of making the lines perfect on an imperfect surface like a rounded pie top. And you get to schedule yourself tea making time, and that friends, is always a perk.

Lattice Top Apple Pie

2c AP Flour

1c Cold, salted Butter, cubed

Ice water

Filling:

8 cups of chopped apples, a mix, I used ambrosia, pink lady, granny smith and macintosh.

1c AP Flour

2c Brown Sugar

1tbsp Cinnamon

topping

1 egg yolk mixed with 1 tbsp cream or milk

3 tbsp Coarse Sugar

In a large bowl mix together the flour and butter. Using either a pastry cutter or, like I do, your hands, break apart the butter into lima bean sized pieces.

Slowly incorporate the water, stirring with a fork, adding just enough for the dough to follow to fork as you stir.

With your hands bring the dough together and knead it gently- squish it out with your palms and then fold it over. Repeat this 4-5 times or until the dough gets even the slightest bit tough. Wrap with plastic wrap and keep it in the fridge for at least 30 minutes.

Unwrap the dough and cut in in half.

On a lightly floured surface roll out one half of the dough in a large circle until it will fit your pie dish. Gently place your rolling pin the center of the circle, then drape one side of the dough over top. Pick up the rolling pin and place it on the pie dish and smooth out the dough.

Put this in the fridge.

Put a silpat of a piece of floured parchment paper on a baking sheet.

Roll out the other piece of dough in a long strip, making sure that it is as wide as your pie dish.

Cut this into strips widthwise.

On the silpat arrange the strips as you see in the picture below, and slowly start weaving them together,

one over one under until you get a nice basket weave.

Now put this in the freezer and let it get nice and cold and hard. This is the trick- once the dough is hard you can just slide it on your pie, no finicking the edges or getting filling on the topping.

Preheat the oven to 400F

Pull out the bottom of the pie and shake half the flour onto the bottom of the crust.

While the top is freezing start chopping your apples. Peel and core then and slice them thinly and put them into the bottom shell, layering different kinds.

Top with the rest of the flour, the brown sugar and the cinnamon.

Take the lattice top out of the oven and gently put your hand underneath it and place it upon your pie.

Push the edges down into the corners and cut off any edges of your pie, or fold them over to create a a scalloped edge.

Wash with the egg wash and sprinkle with the coarse sugar.

Put in the oven and immediately bring the temperature down to 325F.

Do not open the oven door for at least the first 20 minutes or cooking.

After twenty minutes rotate the pie and cook for another half hour or until the juices start bubbling in the center an an inserted paring knife meets little resistance when pushed into the center of the pie.

And there you have it, the easiest most delicious apple pie.

Spiced Honey Cake with Fresh Figs

Oh. Finally.

You know that feeling when everything might just be going a little too well? Something has to mess up and stress you out just to restore the balance of the world?

I have a had a great few weeks. Really, truly, great few weeks. My boss at the restaurant I serve at said he would like me to start doing the pastries at both his restaurants! Yes! My editor at Edible Vancouver promoted me to associate editor! Yes! It was Jordan’s birthday, we had a super fun party! Yes!

So of course my site had to go down. It had to go down when my graphic designer was hiking the volcanos of Iceland, largely out of internet range.

If you could see the emails I was writing to the tech support at all the different places that might be able to help, you would be amazed, and also surprised at how polite I was given how completely pushed around I was. I am Canadian I suppose.

So thanks friends, who came and checked even though there was nothing to look at for weeks, and thanks for your patience. I am so very very grateful for it.

I am also grateful for this fig cake. Because when one is mostly happy, but also deeply frusterated, the only thing I know that works, is cake.

Fresh Fig Honeyed Jewel Cake.

1 3/4 cup AP Flour

3/4 tsp Baking Powder

1/2 tsp Baking Soda

1/2 tsp Ground Cinnamon

1/2 tsp Ground Ginger

2 Eggs

1/2 cup Sugar

1/4 cup Brown Sugar

1/2 cup Honey

1/2 cup Milk

1/2 cup Vegetable Oil

1/4 cup Coarse Sugar, for sprinkling on top.

10-13 Plump Fresh Figs, cut in half

Preheat oven to 350F

Butter and flour a 9 inch Cake or tart pan.

In a standing mixer fitted with the paddle attachment cream together the oil, sugars, and honey

Add in the eggs one at a time beating well between each addition and wiping down the sides of the bowls with a spatula to make sure it is all evenly combined.

In a separate bowl sift together the dry ingredients.

Add in one third of the dry ingredients and mix until barely combined. Add in half the milk. Keep repeating until all the ingredients are incorporated being careful not to mix too much as that will make your cake tough.

Pour cake evenly into pan and smooth out with an inverted spatula.

Place figs in a concentric circle starting from the outside and moving in.

Sprinkle with coarse sugar and bake until an inserted skewer comes out with only a few moist crumbs, about 25-30 minutes.